Specify ClickView Server IP settings via the Registry using Group Policy with an ADMX Template

So I was recently going through our Group Policy and found that we were applying a reg file to specify the Server IP for our ClickView Players.  I don’t really like this approach anymore and tend to try and have everything nice and neat so I set about creating a ADM file to store the setting, I also wanted the ability to disable the School Bag feature for our Labs.

Whilst creating the file I relied on the Language Reference for Administrative Templates on MSDN.  I find it much quicker to build it in Notepad with old Syntax then to go around making an XML based ADMX file.

Once I was done, I then got my hands on Microsoft’s free ADMX Migrator (download here) and used it to convert my ADM file.  After a quick clean up, imported them into one of our Domain Controllers and I was then able to manage our ClickView Player a little easier and without having to rely on a reg file. You can download the ADM/ADMX for your Group Policy store below.

ClickView Group Policy ADMX .

Hope that makes life easier for someone.
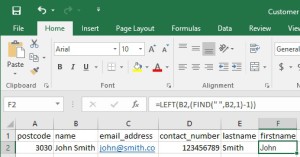
Use Microsoft Excel to split words into cells for easier data manipulation

excel_formulaA client was recently part of an expo and used the opportunity to collect subscribers for their mailing list. Unfortunately the data input method wasn’t designed with their back end database in mind which has a potential customer’s first name and last name separated into different fields.  Luckily the data was clean enough that we could use Excel to perform some manipulation and using formula’s pull words apart.

To do this, there are two formula’s that we need to use, one being LEFT and the other is MID.  In the example above, we have John Smith as the name, we use LEFT to get John and MID to get Smith into separate cells.  The two formulas you need are;

=LEFT(B2,(FIND(" ",B2,1)-1))
=MID(B2,FIND(" ",B2)+1,200)

Using these, simply change the cell location to where your data is (in our case B2). Once everything is split up, the spreadsheet can be exported out and imported into a database table located for example in MySQL.


Configure a login banner or disclaimer on a FortiGate for Terminal and HTTP admin logins

If like me you work in an environment where you have people who are attempting to circumvent your network security it helps to have a banner or disclaimer to warn them about the trouble they will get into if they’re caught. By default when you attempt to login to a FortiGate there is no warning message or login banner.

To enable the banner or disclaimer on a FortiGate (there is both a pre and post login disclaimer you can use) we firstly need to log into the CLI of the FortiGate and enter the following commands to enable the banner. You can substitute pre with post if you wish;

FG621B # config system global
FG621B (global) # set pre-login-banner enable
FG621B (global) # end

Now log into the web ui of FortiOS and go into System > Config > Replacement Messages once there we need to switch to the extended view and the login banners should be at the top of the list, you can edit the default message if you wish, once done click on Save.

Once you try and get the FortiGate via Terminal or Web Management you should get prompted with the Disclaimer message.

How to Configure SNTP/NTP Time Source on HP ProCurve MSM 765zl Wireless Mobility Controller

I was recently investigating authentication methods for our Wireless system and wanted to test out Active Directory.  Basically, the controller would be checking directly with Active Directory if clients should be allowed to access our Wireless network.  After we started configuring Active Directory Authentication we noticed that the time on our MSM controller was off, going under Management -> Time only shows the time on the controller.  After a bit of Google Fu we found that the MSM Controller will get the time off the zl Chassis it is plugged into but you need to be on 5.5.3.0 or higher.

The below configuration is an example of logging into the MSM zl Module itself and configuring the time, you can also do this directly on your zl Chasis in config mode and using the NTP commands below.

First thing we need to do is find where our MSM module is installed on our zl chasis, we can do this by issuing the below command which outputs the below.

CoreSwitch(config)# show services
                Installed Services
 Slot   Index Description              Name
 B  1. Services zl Module              services-module
 B  2. HP ProCurve MSM765 zl Int-Ctlr  msm765-application

 
Okay, so now we know where the MSM module is, let’s log into it and get into configuration mode of the zl module by issuing the below commands.

CoreSwitch(config)# services  B 2
CoreSwitch(msm765-application-B)> enable
CoreSwitch(msm765-application-B)# conf
CoreSwitch(msm765-application-B)(config)#

And finally, we need to configure the NTP settings by configuring NTP, using the SNTP protocol and pointing it to an NTP server, which in our case was a Server 2008 R2 PDC.

CoreSwitch(msm765-application-B)(config)# ntp protocol sntp
CoreSwitch(config)# ntp server 1 10.1.0.104
CoreSwitch(config)# ntp server
CoreSwitch(config)#

Setting item level (Calendar, Tasks etc) permissions for Mailboxes and Users with PowerShell for Exchange 2007, 2010 and 2013

Every so often I get a request to allow people to view someone else’s calendar. Usually I just tell that person to go and ask whom ever the calendar belongs to, to give them permission. This isn’t always possible though as on a few occasions where I’ve had to give access because that other person is away.

With mailboxes you can use the management tools to give access rights, but what if I just want to give the, access to a calendar or tasks for example. This is where the exchange PowerShell console comes in. I can give a user Permission to a particular object. So for example I wanted to give user1 permission to edit manager 1’s calendar, I would do the following

Add-MailboxFolderPermission -identity manager1:\Calendar
-user user1 -accessrights Editor

You can use the following on all of the Outlook Exchanged based folders like so replacing <User> with the identity of the mailbox with the object you want to modify the permissions of and <delegate_user> with the username of the person of who you are giving permission to;

Add-MailboxFolderPermission &lt;User&gt;:\Calendar -User &lt;delegate_user&gt; -AccessRights Editor
Add-MailboxFolderPermission &lt;User&gt;:\Tasks -User &lt;delegate_user&gt; -AccessRights None
Add-MailboxFolderPermission &lt;User&gt;:\Inbox -User &lt;delegate_user&gt; -AccessRights None
Add-MailboxFolderPermission &lt;User&gt;:\Contacts -User &lt;delegate_user&gt; -AccessRights None
Add-MailboxFolderPermission &lt;User&gt;:\Notes -User &lt;delegate_user&gt; -AccessRights None
Add-MailboxFolderPermission &lt;User&gt;:\Journal -User &lt;delegate_user&gt; -AccessRights None

You can also quickly check who has access to an object (like a calendar) by using the following cmdlet, again replacing <user> with the identity of the mailbox;

get-mailboxfolderpermission -identity &lt;user&gt;:\Calendar

Hope that helps someone.