Setting the default wallpaper on a Windows 10 image deployment through MDT

Action - Set Default WallpaperSo recently I’ve been working on improving and streamlining our imaging process. One of the pain points that I have had with Windows 10 was an easy way of setting the default wallpaper, but without locking out the user, i.e. Group Policy from changing it in the future. After a long session of Google Fu and finding Powershell and VB scripts I settled on a simple solution of a batch file to take ownership and replace the default wallpaper files.

As the majority of our devices are laptops, I set the default img0.jpg to a resolution of 1366 x 768 and then proceeded to create all of the different resolutions in the 4K folder, 1024×768, 1200×1920, 1366×768, 1600×2560, 1920×1200, 2160×3840, 2560×1440, 2560×1600, 3840×2160, 768×1024, 768×1366. Once I had all the images ready, I created a file structure and then made the below batch or cmd file for my Application Install Task. If you are running SCCM instead of just MDT, change Administrators to SYSTEM.

takeown /f c:\windows\WEB\wallpaper\Windows\img0.jpg
takeown /f C:\Windows\Web\4K\Wallpaper\Windows\*.*
icacls c:\windows\WEB\wallpaper\Windows\img0.jpg /Grant Administrators:(F)
icacls C:\Windows\Web\4K\Wallpaper\Windows\*.* /Grant Administrators:(F)
del c:\windows\WEB\wallpaper\Windows\img0.jpg
del /q C:\Windows\Web\4K\Wallpaper\Windows\*.*
copy "%~dp0img0.jpg" c:\windows\WEB\wallpaper\Windows\img0.jpg
copy "%~dp04k\*.*" C:\Windows\Web\4K\Wallpaper\Windows

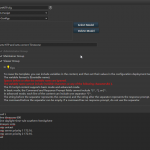
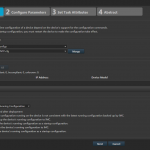
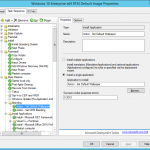
Once I had everything ready, I created an New Application Install called Action – Set Default Wallpaper and got it to call my batch file. Once that was done, I went and added it into my Task Sequence for building our Windows 10 Image as one of the first items to run once Windows 10 has passed the OOBE stage, so under State Restore, after the Windows Updates.

That process has worked every time flawlessly for me, where as the scripts I had found didn’t.

Adjust resource mailbox calendar permissions on Exchange 2010/2013 using PowerShell

Quick one today.  By default, when creating a room resource mailbox, Exchange will grant default permissions of AvailabilityOnly for any user (default), if you are after people knowing who has booked a room or resource then you can adjust the permissions to Reviewer. The quickest way to do this is via PowerShell, you can use the following cmdlet;

Add-MailboxFolderPermission -Identity MeetingRoom2:\Calendar -user "Staff - All Staff" -AccessRight Reviewer

I am using a group (called Staff – All Staff) in the above that does not have any permissions already applied to that mailbox calendar. If the user or group already has some kind of permission, you will need to use Set-MailboxFolderPermissions instead of Add-MailboxFolderPermissions.

If you have multiple Resource Mailboxes, you can pipe a Get-Mailbox to hit them all at once like so;

$rooms = Get-Mailbox -RecipientTypeDetails RoomMailbox
$rooms | %{Add-MailboxFolderPermission $_":\Calendar" -User "Staff - All Staff" -AccessRights Reviewer}

Hope that helps.

Fixing Windows cannot connect to printer with Error Error 0x0000007e when shared on Windows Server 2003 or 2008 32 bit (x86) and your client is 64 bit

Printers and FaxesSo I was out installing a new laptop for a client recently, their server infrastructure is very old (they’re still running Server 2003 but about to migrate) and doing the final stage of the deployment I was installing the local printer in the office but got Windows cannot Connect to the Printer (0x0000007e) error every time I tried.
I finally stumbled upon an old forum topic regarding HP print driver incompatibilities between 32 server and 64 bit client machines where it was unable to find a particular file.

The trick was to delete the following registry key HKEY_LOCAL_MACHINE\SYSTEM\CurrentControlSet\Control\Print\Printers\PrinterNameHere\CopyFiles\BIDI replacing PrinterNameHere with the name of your printer. This then allowed me to connect to the printer correctly on the 64 bit client without any errors.

Issues Deploying a Custom Windows 10 Start Menu Layout when using an image with a Default Profile

So I’m in the final stages of getting our Windows 10 Deployment ready to go and I am currently in the process of branding and customising our image, which includes setting a custom Start Menu Tile Layout.  This is done with the use of two PowerShell commands Export-StartMenuLayout and Import-StartMenuLayout.

I created our preferred start menu, exported on my test computer and then added a Task to our MDT Deployment Task Sequence.

I found that this completed without any errors but Windows was not applying the Start Menu, after a bit of digging around, I found an issue where if you have CopyProfile set to true in your unattend xml answer file then there is another step that you need to complete which is to delete the TileDataLayer folder located in C:\Users\Default\AppData\Local and once I added that line to my batch file the Start Menu appeared.  My complete batch file is as follows;

powershell.exe -ExecutionPolicy Bypass -Command "Copy-Item '%~dp0StartMenu.xml' -destination C:\Windows\Temp; Import-StartLayout -LayoutPath C:\Windows\Temp\StartMenu.xml -MountPath $env:SystemDrive\; Remove-Item C:\Windows\temp\StartMenu.xml -Force"
rmdir C:\Users\Default\AppData\Local\TileDataLayer /q /s

Hope that helps.

Using HP Intelligent Management Center (IMC) to push out configuration changes to your Network Switches

I’m currently consulting out at a school and implementing some changes for their environment, one of which is tightening up their networking environment seeing as I don’t want to remote into 60 odd switches to make changes to each of them we can use HP’s Intelligent Management Center (which schools generally get on the cheap).  The task of adding the switches into IMC had already been done by the guys at the school already and is fairly quick to complete using the discovery wizard if everything on the switches is left at their default settings. Any kind of configuration can be pushed out via IMC apart from VLAN and ACL management which happens under the Services menu in their respective options.   For this example I’m configuring NTP for their switches, using the below CLI, replace xxx with your IPs;

time timezone 600
time daylight-time-rule southern-hemisphere
timesync sntp
sntp unicast
sntp server priority 1 172.16.xxx.xxx
sntp server priority 2 172.16.xxx.xxx

Now firstly we need to define a configuration template to push out.  Go to Service > Configuration Center > Configuration Templates optionally create a separate folder.  Go into your newly created folder and click Add > Manual Add.  Give the Template a Name and optionally select the switch models our configuration will apply to.  In the content window is where we enter our configuration and once done, hit OK to save.

IMC Deploying Device ConfigNow that we have our configuration ready, we navigate to Service > Configuration Center > Deployment Guide in the page that presents you select the configuration template that we made earlier. Then go in and select the devices we will be deploying this config to.  Once we have that we can also optionally select different deploy strategy options to do things like backup the existing config and save the running config after deployment. In our case I have asked IMC to backup the running configuration before deployment and then save the running config after deployment.  On the next page we can give our specific task a name and schedule a type and time, for this example I have set to run immediately.  After clicking next again we are presented with all of the options that we chose earlier to review.  If everything looks good we can hit finish and it will begin deploying the script (a window will pop up showing the status).

And that’s it.  You can use this feature to do all sorts of things such as pushing out other settings like DNS, SSH or improved security configurations.


Using LDAPS (Secure LDAP Binding) with Moodle for Sign-In running on IIS in a Windows Active Directory Domain

LDAP Server Settings in MoodleThe process for running LDAP queries via secure channel for Moodle is fairly straight forward. This method is not using a trusted certificate but is encrypting the traffic between Moodle and your Domain Controller to prevent snooping. The first thing you will want to do is install the latest OpenSSL binaries onto your Moodle Server. Once this is done, create a folder structure on the C drive like this C:\OpenLDAP\sysconf\ and create a new text file called ldap.conf, in its contents we can enter a single line;

TLS_REQCERT never

Now that OpenSSL is ready to go, restart IIS for good measure. Once things are back up we can enter Moodle, login as an Administrator and change the LDAP query from LDAP:// to LDAPS:// as well as the port from 389 to 636.

Changing the SQL Server Collation After Installation for SQL Server 2012 or 2014 without re-installation

So I was asked recently to setup a test environment for one of our CRM applications. So I went ahead and instead of copying the existing Virtual Machine I decided to create a new one from scratch. Installed SQL Server 2012 and the required application files. As I went to install the database onto the SQL server I had realised that I selected the wrong server database collation during installation (I chose SQL_Latin1_General_CI_AI). I’ve known in the past with 2008 / 2008 R2 I needed to uninstall and reinstall to change the Server Collation. This is no longer the case with SQL Server 2012 or 2014.

After going over the documentation of the software, I needed a Server Collation of SQL_Latin1_General_CP1_CI_AI. I’ll make a couple of recommendations with this method, if you already have databases mounted, back them up, then remove them (as this speeds up the process a fair bit if you have DBs with heaps of rows and indexes). Not sure how supported this is by Microsoft, I’m doing this in an environment where even though it is live data, it isn’t critical.

Anyway, moving on. Firstly, shutdown any SQL Server services that are running and then fire up an Administrative command prompt window and go to the SQL Server Binn directory. Once there, we will issue the following command (you can replace the collation with which ever you need)

sqlservr -m -T4022 -T3659 -s"MSSQLSERVER" -q "SQL_Latin1_General_CP1_CI_AI"

The command above, launches a single user admin mode to connect to the SQL Server -m, enables Trace mode using -t. We specify the instance with -S and set the collation with -q. This will run through the motions and then notify you that the operation has completed and that no user action is required (so close off the window). Start up any SQL services we killed off earlier and the databases will now have the correct Collation (restore if required).

How to remove the Open File Security Warning Prompt during Driver Deployment or User Login when using MDT or SCCM

Security Warning with DriversDuring a deployment of Windows or even after Windows is deployed you see an Open File – Security Warning prompt when a .EXE runs (similar to the one on the right).

This happens because when you download an .EXE, .ZIP, or .CAB Internet Explorer (as well as Firefox and Chrome) saves what is called a Zone Identifier, telling the Operating System the file came from the internet and not a trusted zone.  In certain deployments this can happen several times when a user logs in to load all of the applications into the system tray, some of them being igfxtray.exe, apmsgfwd.exe, apntex.exe, apoint.exe, gfxui.exe, hidfind.exe, hkcmd.exe, igfxpers.exe.

To get around this we need to remove the ZoneIdentifier, we can use a small utility from SysInternals to do it.  Download Streams, copy it to your MDT or SCCM Server and run the following changing the path to a location containing your drivers;

streams.exe -s -d "E:\MDTDeploymentShare\Out-Of-Box Drivers"

Make sure you run that in an Administrative command prompt and accept the license agreement on the first run. Hope that helps.

Getting a machine product name and serial number using WMIC for use with MDT or SCCM

wmic csproduct get name outputQuick post today, I organise my driver folders into manufacturer and model and then use a task sequence to pick machine specific drivers. Getting the exact model name helps and one day to do that is via a WMI query. It’s a command I try to use quite a bit (and tend to forget the command half the time).

wmic csproduct get name

The result should give you the exact name returned by WMI and allow you to use it as a variable in your task sequence. Then, just plug in your model you are targeting into an MDT or SCCM task sequence condition. For an SCCM example;

SELECT * FROM Win32_ComputerSystem WHERE Model LIKE "%OptiPlex 9020%"

Another useful one is;

wmic bios get serialnumber

This one shows the machine serial number and if you’re not using SCCM can be useful for warranty claims.

Enable a user to Change their Password if it has Expired using OWA for Exchange 2010 and 2013

OWA Change PasswordIf you work in a place with a lot of remote users and a password policy with expiration set then you need to give your users a way to reset their passwords.  Microsoft ISA / TMG configured with forms based authentication were able to do this out of the box.  The good news is Exchange 2010 and 2013 also have the capability, it just needs to be enabled. Change the following registry entry at your own risk.

Go to the following registry key: HKEY_LOCAL_MACHINE\SYSTEM\CurrentControlSet\Services\MSExchangeOWA and then create the following REG_DWORD value if it doesn’t already exist ChangeExpiredPasswordEnabled. Once created set the DWORD value to 1.

Once you have done that simply recycle the OWA Web Application under IIS or give IIS itself a restart and your users will now be prompted to change their passwords if they are expired instead of having to call the IT helpdesk.