Exchange Management Console not setting Permissions for Receive Connectors, fixing 5.7.1 Client was not authenticated issues with inbound e-mails

I was recently helping out on a migration from Exchange 2003 to Exchange 2010. The organisation was moving from two servers, a front end and back end server to four with two Mailbox servers running in a DAG (Database Availability Group) configuration and two Client Access Servers in an array and along with Hub Transport roles on the two CAS Servers.  They had been running their Exchange 2003 server for a while with routing connectors setup so the 2003 machine was handling all of the external mail and it had finally come time to decommission the old server and tell the firewall to push e-mail to the two new Hub Transport servers.

By default, Exchange 2010 sets up two connectors, one Client SERVERNAME and Default SERVERNAME with the default connector handling your external e-mail. For external servers to connect to the connector we need to enable anonymous authentication for the connector. So we went ahead, opened up the connector and ensured the Anonymous was ticked, clicked apply for good measure and then Ok. After using telnet to remotely connect to the e-mail server (via 3G) we recieved a Client not autenticated message after giving it the mail from command. So it was clear to me that the EMC (Exchange Management Console) wasn’t saving the authentication settings. So we resorted to powershell to configure the connector. I opened up the Exchange Management Shell and issued the following command

Get-ReceiveConnector -identity "Default SERVERNAME" | list

The list contained everything that was ticked bar the Anonymous that we had just enabled. So we decided to run a Set command to update the permissions list for the Default connector. I issued the following command with SERVERNAME being the name of the Exchange Server hosting the connector

Set-ReceiveConnector "Default SERVERNAME" -PermissionGroups:
"ExchangeUsers, ExchangeServers, ExchangeLegacyServers, AnonymousUsers"

We then ran the Get command again and the Anonymous entry was listed. So after a few minutes we used 3G and telnet to connect back into the e-mail server and after getting passed the mail from command we were relieved that the issued was resolved and that the servers could now accept incomming external e-mail. Microsoft have a good article up on Tech Net regarding Exchange 2010 and the Receive connectors (as well as the defaults Exchange setup creates) at the following article Understanding Receive Connectors.

Note that you won’t recieve this issue if your transport server is an Edge transport server as Exchange setup automatically configures the connectors for external connections.
Thoroughly cleaning up a WSUS server

I was recently tasked with performing a clean-up of some of our servers, removing old files/software installations as well as a clean-up of our WSUS server.  After a quick look I could see that our previous administrator had set it to download Driver updates as well, which was taking up quite a large amount of space and something that we wern’t really looking at using (no driver updates were approved).

So I ran the WSUS clean-up wizard, which removed some old computers, but the driver updates remained. I wanted them gone.  So I quickly made sure that driver updates category wasn’t selected and ran the following PowerShell script on the WSUS machine.

[reflection.assembly]::LoadWithPartialName("Microsoft.UpdateServices.Administration") | out-null
$wsus = [Microsoft.UpdateServices.Administration.AdminProxy]::GetUpdateServer();
$cleanupScope = new-object Microsoft.UpdateServices.Administration.CleanupScope;
$cleanupScope.DeclineSupersededUpdates = $true
$cleanupScope.DeclineExpiredUpdates         = $true
$cleanupScope.CleanupObsoleteUpdates     = $true
$cleanupScope.CompressUpdates                  = $true
#$cleanupScope.CleanupObsoleteComputers = $true
$cleanupScope.CleanupUnneededContentFiles = $true
$cleanupManager = $wsus.GetCleanupManager();
$cleanupManager.PerformCleanup($cleanupScope);

This script took about an hour to run but worked like a charm. It basically cleaned up the whole WSUS database, removing old computers, obsolete and unneeded updates (including the drivers I no longer wanted) as well as removing the associated update files which cleaned up a lot of space. The script above is modified so as not to remove computers from the database but that can be simply uncommented and included in the script.

Let me know in the comments if you found this useful.

Procurve Switches and Windows Network Load Balancing in Multicast Mode causing high collision and drop rates

Over the last few days we have been looking at getting a Client Access Array going for our Exchange 2010 setup for basic redundancy and load balancing. I thought I would outline an issue we discovered with using Windows Network Load Balancing in a HP switching environment.

The first is whether to use Unicast or Multicast modes for the NLB Traffic. It is important to remember that Exchange does not care if you use Unicast or Multicast and is entirely dependent on your switching environment. At first we were confused as to which to choose due to the myriad of documentation suggesting either protocol. So we decided to give multicast a go.

After a few minutes our core switch (an 8212zl) started dropping packets for our services VLAN. We shut off the NLB and everything had returned to normal.  After a bit of digging we found that ProCurve switches are not compatible with multicast mode NLB due to their inability to have static ARP tables (they can only cache). But this can be remedied somewhat by issuing the following command on some models of switches:

ProCurve(config)# ip arp-mcast-replies

The command is supported on HP ProCurve E8200zl series, E5400zl series, E3500yl series, E6600 series and E6200yl series switches support Microsoft Windows NLB in Multicast mode.  Simply ensure that these switches are running K.15.03.0007 or greater firmware.

Setting up an SPN and fixing the cannot verify the service principal name error when installing ForeFront Endpoint Protection

We are currently in the process of trailing Forefront Endpoint Security along with our SCCM Deployment.  So after a few weeks of tweaking we have got our systems center deployment to a level where we are happy with it, it was time to begin installing and testing Forefront.

After beginning our installing and answering a few questions the setup begins to validate some per-requisites. Apart from having reporting services installed and configured on a SQL Server you also need to have the service account for SQL Server to be publishing its existence via a Service Principal Name or SPN. If the account doesn’t have a valid SPN entry then you will receive the following message during the per-requisites check of the Forefront setup.

Setup cannot verify the service principal name (SPN) for this account.
Ensure that there is a single valid SPN entry for this account in the
Active Directory Domain Services.

So how do we go about adding an SPN entry. We will use sqlservice as our user account. We can either do this via ADSIedit or the command prompt. Open up an elevated command prompt and enter the following command:

setspn -a MSSQLSvc/sqlserver.fqdn domain\sqlservice

with MSSQLSvc being the protocol, sqlserver the name of the Server hosting SQL Services along with your fully qualified domain name and finally the account you wish to add the SPN entry for. To check that you have successfully added the spn you can do the following:

setspn -l domain\sqlservice

which will list the account along with SPNs being advertised for that particular account.

The quicker way would be to run ADSIedit, find the account you wish to add the SPN for, right click and go properties and then under the attribute editor. From there navigate down the list until you find servicePrincipalName and click edit. You can then enter the SPN in the same format as above, which is:

MSSQLSvc/sqlserver.fqdn

And there you have it, you can continue to install Forefront without any issues so long as you meet the other requirements of the setup.

Fixing SMS Site Component Manager could not access site system. Access is denied. Issue when adding SCCM components to other servers.

I recently decided to move our reporting services running on our SCCM site server to our more beefier SQL Server, I was also wanting to do this for our Forefront Migration (as Reporting services is a requirement). So I created a new server under Site Settings -> Site Systems and put our SQL server into there. I then added the ConfigMgr Reporting Point and Reporting services point with SCCM adding in Component Server and Site System into the roles.

After a little while I then checked the Site Component Manager logs and found the following error:

SMS Site Component Manager could not access site system "<servername>".
The operating system reported error 2147942405: Access is denied.

So I went looking to make sure that the server was up, and our Administrator account had local machine rights, it was there.

After some further investigation I also found out that the SCCM site server also needs administrative rights, so I added the computer to the local administrator group and restarted the site component manager to force it to retry installing the components and the error disappeared and SCCM began installing the components onto our SQL Server.

Fixing HTTP Error 500.21 – Internal Server Error Handler “WebServiceHandlerFactory-Integrated” has a bad module “ManagedPipelineHandler” in its module list on IIS.

I was recently developing some .net web applications at work and finally took the plunge of setting up a server to host them after I was happy that we had reached the point where they were usable applications.  So after setting up Server 2008 R2, I went ahead and enabled IIS with asp.net configuration enabled along with a host of other modules enabled to support what we were after. Gave the server a reboot and everything was up and ready to go.

Moved over to my development machine and instructed Visual Studio to publish an application to this newly setup web server, everything up until this point had worked perfectly, the web app published without any errors. So I opened up Internet explorer and low and behold error, page cannot be displayed. So I’m like maybe it’s a permissions thing, remoted into the web server and viewed it as a localhost and got Error 500.21 – Internal Server Error  Handler “WebServiceHandlerFactory-Integrated” has a bad module “ManagedPipelineHandler”.  I had gone ahead and configured an application pool for the web apps we were going to use, and everything seemed OK.  I then remembered something, in the good old IIS 6 days you had to run a .net registration program to notify IIS you had it installed and register the handlers for .net, but thinking to myself this is now 2008 R2, come on, it couldn’t be that.

I opened up an elevated command prompt window and navigated to C:\Windows\Microsoft.NET\Framework\v4.0.30319 and ran aspnet_regiis.exe -i causing asp.net to register itself with IIS and enable the handlers required to run .net pages.

After running this command I rebooted IIS and bang the web application started working.  An easy fix but a pity that it couldn’t have run automatically when I insist on installing asp.net under the IIS configuration.


Speeding up LAN based Automation OS boot times using a Custom TFTP Server for Altiris (for WinPE and Linux)

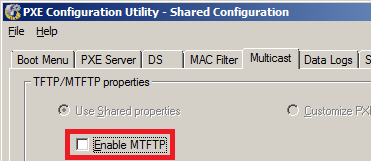
One of the more easier ways of speeding up your WinPE boot times via PXE are changing the default TFTP server which comes with Altiris. First of all, open up the PXE Configuration Manager and disable Multicast since the WinPE image cannot be transferred over Multicast anyway(only DOS supports Multicast via TFTP). This simple tweak shaves around a second off your PXE Boot time.

Another tweak which can be performed is changing the TFTP Server itself. This sounds quite difficult but is quite easy to accomplish and is a significant benefit.  My own testing has shown that 10 Clients concurrently loading a WinPE image do it around 45-50% faster using another TFTP Server than if I was to continue using Altiris’s own server.

I was also going to cover compressing the WinPE image to reduce its file size, but found thatwhen doing so, the reduction in size was minimal shaving off around 10mb.

I’ll be using the Open Source Open TFTP Server, available from http://sourceforge.net/projects/tftp-server/. Download it and install it either on your Altiris Server or like I did, on my workstation and then copy it over to your server. You will also need to copy over your Settings file.

Firstly, open up the Services control applet and Stop the Altiris PXE MTFTP Server service.

Now comes the good part. Open an elevated command prompt. The following is based on our Altiris setup, with it installed on D drive and me creating a folder under PXE for OpenTFTP and pasting the OpenTFTP executable and Settings file into that folder.

sc config "Altiris PXE MTFTP Server" binpath= "D:\Deployment Server\PXE\OpenTFTP\OpenTFTPServerMT.exe"

That will reconfigure the MTFTP service path that Altiris uses to push out files from the Altiris supplied MTFTP to our Open TFTP server. You can go into the Services control applet and start the Altiris MTFTP service to begin using the new executable.

To try and get the most out of OpenTFTP server, have a play with the Settings file, primarly the blksize option. Ours is set to 1456 and can be changed depending on your network environment.

If for any chance you want to return to the Altiris MTFTP server then you simply need to run the sc config command pointing to your Altiris PXE MTFTP executable so stop the service again and enter the following into an elevated command prompt making sure to match the path to your Altiris location:

sc config "Altiris PXE MTFTP Server" binpath= "D:\Deployment server\PXE\PxeMtftp.exe"

Then start the service again and you are back to using the default Altiris multi-thread TFTP server.

This simple tweak shaves heaps of time off of WinPE (also Linux) automation boot times. If you are running the Dos based automation then there isn’t really a need to run this tweak as the transfer is small enough not to take long anyway.

Hope that helps.

How to set (and change) an NTP time source in Windows Server 2008 R2 (SBS 2011 and Vanilla Server).

Recently, the clocks on my home networked PCs began drifting off sync until the difference was around 30 minutes. At first i thought that my SBS server was no longer synching with time.windows.com (the default time server for windows). After a quick look at the event log, I could see that it was syncing correctly and that the date and timezone were correct. So I began to look at how I could change the NTP server that Windows was syncing with. Unlike Windows XP, which had a tab were you could set the source and even add your own in the date and time control panel applet, Windows Server 2008 and Windows 7 have nothing of the sort, so how was I going to change the source. A quick look on technet led me to an article titled Windows Time Services Tools and Settings.

To query the time service about its current status open up an elevated command prompt and type in:
w32tm /query /status

This will display the following output (it will either state Source: Local CMOS Clock or time.windows.com)

After working out the souce and that it was synching without error as well as the obvious the fact the time was way off I needed to find a reliable Time service. After a bit of searching around the web I found pool.ntp.org which is the part of the home for the Network Time Protocol open source project (ntp.org). Members work together to provide a public pool of time servers for use by individuals and businesses. pool.ntp.org uses DNS round robin to make a random selection from a pool of time servers who have volunteered to be in the pool making this service highly redundant and reliable.

If you navigate to the Time Servers page on their wiki you will see a list of servers as rell as regional servers which you can also choose from.  Since I’m in Australia I narrowed it down to Oceanaia and then Australia leaving me with au.pool.ntp.org.  So basically I now had to reconfigure the Windows Time service to sync with the NTP Australian Server Pool. A quick look over the technet documentation told me the commands I needed to run which was:
w32tm /config /manualpeerlist:au.pool.ntp.org

Which after being executed in an elevated command prompt will leave you with command completed successfully.  Once that is configured we need to restart the time service by either doing net stop/start w32time or via the Services Control Panel on Windows Time.

You can then query the time service again using /query and /status which will present you with the above output. As you can see the time service is now synching with the service that I specified it to. You can look around the NTP site to find a group of services which are closer to your location, but it generally doesn’t matter where you pick the NTP server from.

And there you have it, how to reconfigure the Windows Time service to look at a different time source.  As a side note before closing off the article, Microsoft don’t fully support the Windows 32 Time service for use in high accuracy environments as mentioned in this Knowledge base article. So if you need something which is highly accurate then you need to look elsewhere.

Assigning resources via logon script based on computer names.

We’ve recently been having an issue where printers being deployed via group policy haven’t been deploying, or are deploying but not being set to default.  So after some investigation, the easiest thing to do would be to write a Visual basic script to ease the deployment of printers throughout our environment. Luckily for us we have naming conventions and machines are usually called 2011uname or 2014uname, based on a student’s final year.

You can use this script for all sorts of things, from allocating printers and mapping network drives. To increase or decrease the amount of characters that the script looks at simply modify the strLength (Define String Check Length) variable at the beginning of the script.

'Actions based on Computer name for logon scripts
'Define String Check Length
strLength = "4"

'Get the computer name
Set WSHNetwork = CreateObject("WScript.Network")
strComputer = WSHNetwork.ComputerName

'Select year level by ending year
Select Case Left(strComputer,strLength)
    Case "2011"
        msgbox "year 12"
    Case "2012"
        msgbox "year 11"
    Case "2013"
        msgbox "year 10"
End Select

The script will print out a message box, but within the case you can specify what ever action you want. Hope that helps someone out.

How to reset the Search Index in Exchange 2010 Search

Exchange 2010 has a built in search feature which allows you to quickly search for emails in your mailbox using Outlook (when Online), OWA, Exchange ActiveSync etc. Exchange 2010 search indexes items as soon as they are received by the Mailbox Database. So if you’ve just transitioned from Exchange 2003 to 2010, Exchange may not index items brought over from the Exchange 2003 server to the Exchange 2010 server. You may find that users using Exchange search may have issues searching for items that were in their mailbox before the transition. For example, you will not be able to find a pre-transition item using instant search but will be able to find them using ‘Advanced Find’ in Outlook.

To fix this issue, you will have to reset the search index to force the Exchange Search service to index all items in the Mailbox Database including items that were moved to the database from Exchange 2003.

To reset the search index, open up the Exchange Management Shell navigate to %PROGRAMFILES%\Microsoft\Exchange Server\V14\Scripts and then run the following command:

.\ResetSearchIndex.ps1 -force -all

You should see output that resembles the following:

WARNING: Waiting for service 'Microsoft Exchange Search Indexer (MSExchangeSearch)' to finish stopping...
MSExchangeSearch service stopped
Deleting catalog for Mailbox Database
removing: <location of catalogue>

MSExchangeSearch service Started

To verify that the rebuilding of the index has completed do the following:

  1. Add this counter to Perfmon: MSExchange Search Indices\Full Crawl Mode Status. This counter will be 0 before running ResetSearchIndex, go to 1 during the full crawl and then back to 0 after ResetSearchIndex completes.
  2. You will receive MSExchange Search Indexer Event ID 109 when the full crawl begins.
  3. You will receive MSExchange Search Indexer Event ID 110 when the full crawl ends.

You should now be able to search for pre-transition items using Exchange search.