Random password prompts with users running Windows Phone / Mobile Active Sync for Exchange through ISA 2006 or TMG Reverse Proxy

form options

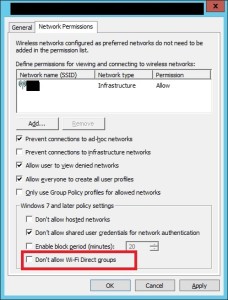
So I recently came across an issue where some end users were getting prompted for their password when running a Windows Phone device (Android and Apple devices seem immune).  The client had recently had an Office 365 hybrid configuration completed and where using ISA / TMG as a reverse proxy to authenticate to their local infrastructure for external users. Their move to a hybrid deployment required some changes to the way they had TMG setup (adding another web listener and re-configuring some rules).

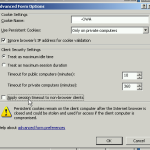
Judging from the password prompt, I quickly gathered that the issue was around a web listener, so opening up their one for Exchange, the listener used forms based authentication, so I went to the Forms tab and hit Advanced to see what options had been enabled or disabled.  I could see that Apply session timeout to non-browser clients was enabled. After disabling this option and applying the changes, ActiveSync clients stopped prompting users for their passwords and the sessions remained active even after the timeout value expired.

Hyper-V Virtual Machine stops responding to network traffic if VMQ (Virtual Machine Queues) are enabled on a 1GB physical NIC

vmqI recently took on a new customer who’s IT infrastructure was a mess.  They have good hardware but the setup they had was just awful (it was an internal guy who had great ideas but little skill).  They had Hyper-V running on a nice new Gen9 HP Server on Windows Server 2012 R2, which is a nice combination.  Once they were on boarded they let us know that the server kept on crashing (they had no idea their setup was virtualised or that they had more than one server…).    Virtual Machine Queuing or VMQ allows the “virtualization” of the network allowing for the NIC to create paths to each virtual NIC to offload the traffic.

After about a week, I got the call I was waiting for to tell me their server had stop responding, the virtual machine was still up but wasn’t responding to pings or allowing access to network resources (it was their SBS server).   So as a quick fix, I disabled and re-enabled the NIC on the server (as a best practice you should have a dedicated Management NIC to allow access to the host), this brought things back online.  After having a quick look at the Broadcom NIC it had VMQ enabled, I then set it to disabled and restarted the server out of hours.  Since then there hasn’t been any issues with the servers dropping off the network.

The issue hasn’t resurfaced since and is documented in the following Microsoft KB article https://support.microsoft.com/en-us/kb/2986895

It is interesting to note that the server had the latest drivers and firmware installed but was still having the issue, so I’d recommend leaving VMQ Disabled completely as the benefits aren’t that great (unless your high-traffic 10 Gbps).

Specify ClickView Server IP settings via the Registry using Group Policy with an ADMX Template

So I was recently going through our Group Policy and found that we were applying a reg file to specify the Server IP for our ClickView Players.  I don’t really like this approach anymore and tend to try and have everything nice and neat so I set about creating a ADM file to store the setting, I also wanted the ability to disable the School Bag feature for our Labs.

Whilst creating the file I relied on the Language Reference for Administrative Templates on MSDN.  I find it much quicker to build it in Notepad with old Syntax then to go around making an XML based ADMX file.

Once I was done, I then got my hands on Microsoft’s free ADMX Migrator (download here) and used it to convert my ADM file.  After a quick clean up, imported them into one of our Domain Controllers and I was then able to manage our ClickView Player a little easier and without having to rely on a reg file. You can download the ADM/ADMX for your Group Policy store below.

ClickView Group Policy ADMX .

Hope that makes life easier for someone.

Use Microsoft Excel to split words into cells for easier data manipulation

excel_formulaA client was recently part of an expo and used the opportunity to collect subscribers for their mailing list. Unfortunately the data input method wasn’t designed with their back end database in mind which has a potential customer’s first name and last name separated into different fields.  Luckily the data was clean enough that we could use Excel to perform some manipulation and using formula’s pull words apart.

To do this, there are two formula’s that we need to use, one being LEFT and the other is MID.  In the example above, we have John Smith as the name, we use LEFT to get John and MID to get Smith into separate cells.  The two formulas you need are;

=LEFT(B2,(FIND(" ",B2,1)-1))
=MID(B2,FIND(" ",B2)+1,200)

Using these, simply change the cell location to where your data is (in our case B2). Once everything is split up, the spreadsheet can be exported out and imported into a database table located for example in MySQL.


Configure a login banner or disclaimer on a FortiGate for Terminal and HTTP admin logins

If like me you work in an environment where you have people who are attempting to circumvent your network security it helps to have a banner or disclaimer to warn them about the trouble they will get into if they’re caught. By default when you attempt to login to a FortiGate there is no warning message or login banner.

To enable the banner or disclaimer on a FortiGate (there is both a pre and post login disclaimer you can use) we firstly need to log into the CLI of the FortiGate and enter the following commands to enable the banner. You can substitute pre with post if you wish;

FG621B # config system global
FG621B (global) # set pre-login-banner enable
FG621B (global) # end

Now log into the web ui of FortiOS and go into System > Config > Replacement Messages once there we need to switch to the extended view and the login banners should be at the top of the list, you can edit the default message if you wish, once done click on Save.

Once you try and get the FortiGate via Terminal or Web Management you should get prompted with the Disclaimer message.

How to Configure SNTP/NTP Time Source on HP ProCurve MSM 765zl Wireless Mobility Controller

I was recently investigating authentication methods for our Wireless system and wanted to test out Active Directory.  Basically, the controller would be checking directly with Active Directory if clients should be allowed to access our Wireless network.  After we started configuring Active Directory Authentication we noticed that the time on our MSM controller was off, going under Management -> Time only shows the time on the controller.  After a bit of Google Fu we found that the MSM Controller will get the time off the zl Chassis it is plugged into but you need to be on 5.5.3.0 or higher.

The below configuration is an example of logging into the MSM zl Module itself and configuring the time, you can also do this directly on your zl Chasis in config mode and using the NTP commands below.

First thing we need to do is find where our MSM module is installed on our zl chasis, we can do this by issuing the below command which outputs the below.

CoreSwitch(config)# show services
                Installed Services
 Slot   Index Description              Name
 B  1. Services zl Module              services-module
 B  2. HP ProCurve MSM765 zl Int-Ctlr  msm765-application

 
Okay, so now we know where the MSM module is, let’s log into it and get into configuration mode of the zl module by issuing the below commands.

CoreSwitch(config)# services  B 2
CoreSwitch(msm765-application-B)> enable
CoreSwitch(msm765-application-B)# conf
CoreSwitch(msm765-application-B)(config)#

And finally, we need to configure the NTP settings by configuring NTP, using the SNTP protocol and pointing it to an NTP server, which in our case was a Server 2008 R2 PDC.

CoreSwitch(msm765-application-B)(config)# ntp protocol sntp
CoreSwitch(config)# ntp server 1 10.1.0.104
CoreSwitch(config)# ntp server
CoreSwitch(config)#

Setting item level (Calendar, Tasks etc) permissions for Mailboxes and Users with PowerShell for Exchange 2007, 2010 and 2013

Every so often I get a request to allow people to view someone else’s calendar. Usually I just tell that person to go and ask whom ever the calendar belongs to, to give them permission. This isn’t always possible though as on a few occasions where I’ve had to give access because that other person is away.

With mailboxes you can use the management tools to give access rights, but what if I just want to give the, access to a calendar or tasks for example. This is where the exchange PowerShell console comes in. I can give a user Permission to a particular object. So for example I wanted to give user1 permission to edit manager 1’s calendar, I would do the following

Add-MailboxFolderPermission -identity manager1:\Calendar
-user user1 -accessrights Editor

You can use the following on all of the Outlook Exchanged based folders like so replacing <User> with the identity of the mailbox with the object you want to modify the permissions of and <delegate_user> with the username of the person of who you are giving permission to;

Add-MailboxFolderPermission &lt;User&gt;:\Calendar -User &lt;delegate_user&gt; -AccessRights Editor
Add-MailboxFolderPermission &lt;User&gt;:\Tasks -User &lt;delegate_user&gt; -AccessRights None
Add-MailboxFolderPermission &lt;User&gt;:\Inbox -User &lt;delegate_user&gt; -AccessRights None
Add-MailboxFolderPermission &lt;User&gt;:\Contacts -User &lt;delegate_user&gt; -AccessRights None
Add-MailboxFolderPermission &lt;User&gt;:\Notes -User &lt;delegate_user&gt; -AccessRights None
Add-MailboxFolderPermission &lt;User&gt;:\Journal -User &lt;delegate_user&gt; -AccessRights None

You can also quickly check who has access to an object (like a calendar) by using the following cmdlet, again replacing <user> with the identity of the mailbox;

get-mailboxfolderpermission -identity &lt;user&gt;:\Calendar

Hope that helps someone.

Migrating your whole RADIUS configuration (IAS) from Server 2003 to Server 2012 (NPS)

nps
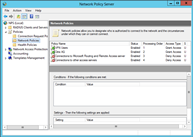
I was recently migrating an environment that ran two 2003 servers to two 2012 R2 servers. One of the challenges of migrations is ensuring there is as little disruption as possible, whether it is during business hours or not. This organization had a single RADIUS server controlling access to their 300+ users for Wireless and Remote Access.

One of the useful tools nestled away in the 2008 R2 / 2012 installation media is a tool called IASmigrader.exe. This invaluable little tool can easily migrate the entire IAS / RAdius configuration from Server 2003 and allow me to import it into NPS (better than mucking around with netsh and then manually editing text files). Fine the executable you need in :\sources\dlmanifests\microsoft-windows-iasserver-migplugin\, copy this onto the source machine where IAS is. Once there, open a command prompt and type iasmigreader.exe relative to where you copied it.

Once ran, the tool will export the configuration to %windir%\system32\ias\ias.txt, copy this file across to your new NPS host and open up the NPS console, right click on NPS and select Import Configuration and browse to the text file (you will need to drop down the file type box) and import the configuration, I generally restart the NPS service for good measure. You can also run netsh nps import filename=”C:\migration\ias.txt” in an elevated command prompt.

Get the username of a person logged onto a computer remotely using PowerShell and WMI

So recently I was out visiting a customer who had issues with someone hammering their internet.  We enabled netflow on their Cisco router to do a show top-talkers.  Once we got an IP address we were able to find the machine, but not who.  So I quickly entered the following into PowerShell and got the person we were after (change COMPUTERNAME to the target machine name).

Get-WmiObject Win32_ComputerSystem -ComputerName "COMPUTERNAME" |
Select-Object -ExpandProperty UserName

You will need to have admin rights on the target machine for the above to work.

Another way you can do it is to use wmic to achieve the same result, enter the below into a command prompt window, changing COMPUTERNAME to the target machine;

wmic.exe /node:COMPUTERNAME computersystem get username

Hope that helps someone out.

Wireless Projection / Miracast option disappears from Microsoft Surface Pro 3 / Windows 8.1 after joining a Active Directory Domain

We recently deployed some Microsoft Surface Pro 3s (love these devices) for our Executive team along with some new equipment in meeting / board rooms with Wireless Display capabilities. During testing with my personal SP3 (not domain joined) the wireless display worked a treat, so I expected it to work fine on the ones we would be deploying.

After about a week, one of the managers shot me an e-mail saying he couldn’t see the option for wireless display, that night he had performed a reset of the device, came in and had the option, but once we joined it back to the domain, it disappeared. I started digging around Group Policy to see what was causing it to disappear and found that these devices were getting an old “XP” based Wireless Network Policy.  I upgraded the policy which then gave us some extra options, including allowing / disallowing Wi-Fi Direct.upgraded policy

Computer Configuration > Policies > Windows Settings >Security Settings > Wireless Network (IEEE 802.11) Policies

The setting Don’t allow Wi-Fi Direct groups which needs to be disabled can be found under the “Network Permissions” tab. From what I can see, any Wireless policy configured for XP doesn’t have this option and a machine will simply disallow it.

How is Miracast or WiDi related to Wi-Fi Direct?  Well basically Wi-Fi Direct allows devices to connect directly to each other, without the need for a Wi-Fi AP, which is exactly what your surface is doing when attempting to stream the display straight to a TV / Projector.

Once we had this option turned off, ran a gpupdate on the machine and viola, wireless display showed up and began working.