 I’m currently consulting out at a school and implementing some changes for their environment, one of which is tightening up their networking environment seeing as I don’t want to remote into 60 odd switches to make changes to each of them we can use HP’s Intelligent Management Center (which schools generally get on the cheap). The task of adding the switches into IMC had already been done by the guys at the school already and is fairly quick to complete using the discovery wizard if everything on the switches is left at their default settings. Any kind of configuration can be pushed out via IMC apart from VLAN and ACL management which happens under the Services menu in their respective options. For this example I’m configuring NTP for their switches, using the below CLI, replace xxx with your IPs;
time timezone 600
time daylight-time-rule southern-hemisphere
timesync sntp
sntp unicast
sntp server priority 1 172.16.xxx.xxx
sntp server priority 2 172.16.xxx.xxx
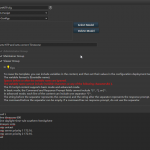
Now firstly we need to define a configuration template to push out. Go to Service > Configuration Center > Configuration Templates optionally create a separate folder. Go into your newly created folder and click Add > Manual Add. Give the Template a Name and optionally select the switch models our configuration will apply to. In the content window is where we enter our configuration and once done, hit OK to save.
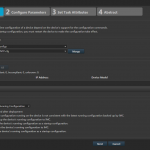 Now that we have our configuration ready, we navigate to Service > Configuration Center > Deployment Guide in the page that presents you select the configuration template that we made earlier. Then go in and select the devices we will be deploying this config to. Once we have that we can also optionally select different deploy strategy options to do things like backup the existing config and save the running config after deployment. In our case I have asked IMC to backup the running configuration before deployment and then save the running config after deployment. On the next page we can give our specific task a name and schedule a type and time, for this example I have set to run immediately. After clicking next again we are presented with all of the options that we chose earlier to review. If everything looks good we can hit finish and it will begin deploying the script (a window will pop up showing the status).
And that’s it. You can use this feature to do all sorts of things such as pushing out other settings like DNS, SSH or improved security configurations.