Windows 10 May 2019 or 1903 Software Update Management Changes for WSUS and Config Manager

We’ve started to deploy the latest release of Windows 10 and it’s interesting to note that Microsoft have released with little fan-fare some changes to the way Updates are deployed for the 1903 release.

Microsoft are now pushing updates through what is called the Unified Update Platform (see this RPC Mag article). Anyway, the main thing is there is now a new product category for WSUS and Config Manager that needs to be configured before your clients will being to receive updates.

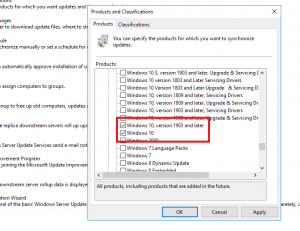
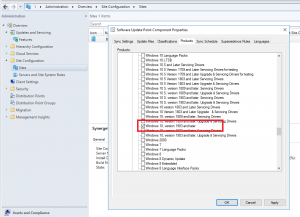
You’ll see there is now a Windows 10, version 1903 and later product – make sure that is ticked on your Update Management Tool for updates to by synchronised. Once we had that ticked, for Config Manager you may need to tweak your Automatic Deployment Rule to include additional filters based on how you have it setup.  Microsoft have also blogged about these changes here.

Fixing the randomly stopping WsusPool IIS Application pool and Windows Updates failed 0x80244022 error

I was recently assisting a client with an upgrade of their Configuration Manager (SCCM) environment up to the latest release of 1702 and as part of that we’re also going over it’s currently deployed functionality and making sure it all works. They recently noted that clients were no longer receiving updates and ran the Software Update functionality of ConfigMgr, which funnily enough also relies on WSUS to sync up to Microsoft (but not push out the updates themselves).

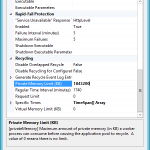
So when troubleshooting Updating issues, you need to check both the Software Update Point and WSUS, and lowe and behold the WSUS console kept on crashing. After checking the Update Services service, I then turned to IIS and noticed the UpdatedServices Application pool had stopped, so I started it and went back into the console but soon noticed it had died again. After reading some advice on the TechNet forums they suggested raising the memory limit of the Wsus Application Pool, which is done by selecting the Application Pool Name and then clicking Advanced on the right hand side or right click menu. Scroll down to the bottom of the Advanced Settings Window until you see Private Memory Limit (KB) and increase this from the default of 1843200 (which is 1.8 GB) to 4194304 (which is 4 GB). Make sure you have enough RAM allocated to the machine, if you are feeling courageous you can also set the value to 0 which does not set a limit.

After increasing the available memory to the AppPool, WSUS synchronized successfully and clients were now receiving updates

PowerShell Script to Install Updates Offline in a WIM image using DISM

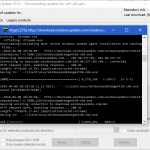
WSUS Offline Downloader in actionI’ve been helping out a customer build a new MDT deployment environment and move away from Ghost and the 90’s. As they are not going to be implementing Systems Center Configuration Manager and SUP to automatically maintain their images offline any time soon, we need a way to keep their image up to date with updates, without having to re-build it every time.

I knew you could already do offline servicing with DISM but wanted to make it nice and easy for them. I’m using WSUS Offline Update to download all of the updates in one shot, you could also use WUD but their lists haven’t been updated for a while.  I copied the zip and extracted it to their deployment server and downloaded all of the updates for Windows 7 x64 SP1 and saved them all to a single updates folder. I then built up the below PowerShell script to offline service their image and apply the updates downloaded.

$UpdatesPath = "E:\Updates\*"
$MountPath = "E:\MDTDeploymentShare\Operating Systems\W7X64SP1\Mount"
$WimFile = "E:\MDTDeploymentShare\Operating Systems\W7X64SP1\REFW7X64.wim"

DISM /Mount-Wim /WimFile:$WimFile /index:1 /Mountdir:$MountPath
$UpdateArray = Get-Item $UpdatesPath
ForEach ($Updates in $UpdateArray)
{
DISM /image:$MountPath /Add-Package /Packagepath:$Updates
Start-Sleep –s 5
}
Write-Host "Updates Applied to WIM"
DISM /Unmount-Wim /Mountdir:$MountPath /commit
DISM /Cleanup-Wim

If you have 100+ updates this process can take a while so sit back and drink a coffee while you run the script. Hope that helps.

Update WSUS 3.0 SP2 to support Windows 8 and Windows Server 2012 Clients

Just a quick one today.  Microsoft have released an update for those running WSUS 3.0 SP2 which allows you  to provide updates to clients running Windows 8 and Server 2012.  The update is available at this Knowledge Base Article for both 32 and 64 bit environments.

Also, no word yet on when they will be releasing a patch for the IE flaw (see here and here), but should be available over the next few days.

Thoroughly cleaning up a WSUS server

I was recently tasked with performing a clean-up of some of our servers, removing old files/software installations as well as a clean-up of our WSUS server.  After a quick look I could see that our previous administrator had set it to download Driver updates as well, which was taking up quite a large amount of space and something that we wern’t really looking at using (no driver updates were approved).

So I ran the WSUS clean-up wizard, which removed some old computers, but the driver updates remained. I wanted them gone.  So I quickly made sure that driver updates category wasn’t selected and ran the following PowerShell script on the WSUS machine.

[reflection.assembly]::LoadWithPartialName("Microsoft.UpdateServices.Administration") | out-null
$wsus = [Microsoft.UpdateServices.Administration.AdminProxy]::GetUpdateServer();
$cleanupScope = new-object Microsoft.UpdateServices.Administration.CleanupScope;
$cleanupScope.DeclineSupersededUpdates = $true
$cleanupScope.DeclineExpiredUpdates         = $true
$cleanupScope.CleanupObsoleteUpdates     = $true
$cleanupScope.CompressUpdates                  = $true
#$cleanupScope.CleanupObsoleteComputers = $true
$cleanupScope.CleanupUnneededContentFiles = $true
$cleanupManager = $wsus.GetCleanupManager();
$cleanupManager.PerformCleanup($cleanupScope);

This script took about an hour to run but worked like a charm. It basically cleaned up the whole WSUS database, removing old computers, obsolete and unneeded updates (including the drivers I no longer wanted) as well as removing the associated update files which cleaned up a lot of space. The script above is modified so as not to remove computers from the database but that can be simply uncommented and included in the script.

Let me know in the comments if you found this useful.

Moving your SUSDB when it is running under MSDE

During my morning rounds of looking after clients’ servers, running SBS 2008. I noticed one was running out of space.  It had recently been updated to WSUS 3.0 SP2, after doing a quick hard drive space check I found that SUSDB was over five gigabytes in size. Generally this database should be around one gig.  Until I had some time to investigate I thought the best thing to do was to move it to another hard drive, easier said than done.

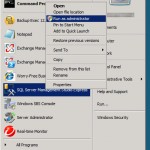
Just a little tip, if you are running under Windows SBS 2008 then you will need to Run as Administratorwill need to run the Management Studio as an Administrative user by right clicking and selecting “Run as Administrator”. This will allow you to connect to the Internal Database as your SBS Admin user doesn’t have permission to do so.
Once the logon screen appears, your first thought would be to simply select the Microsoft##SSEE instance seeing as that is what the internal database is called but it still won’t connect. You need to connect via named pipes. Do so by typing the following into the server name field:
\\.\pipe\MSSQL$MICROSOFT##SSEE\sql\query
Once connected you should be able to SUSDB under the Databases list.  To move the database is quite simple, we will detach, move the database files and then re-attach the database. Best to stop the Update Services Service before continuing (via the Services Snap-In).
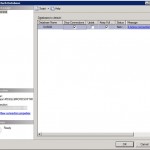
Detach Database DialogOnce in Management Studio, expand Databases and right click on the SUSDB database. From there click on Tasks and select ‘Detach…’ a dialog window will pop up. We will want to ensure that SQL Server drops any connections to the database to ensure a successful detachment of the database, so tick ‘Drop Connections’. Once the process is complete, minimise the Management Studio and navigate to the databases location (usually under ‘c:\wsus\SUSDB’) and move the folder to a location with more space.

Once that is done, we can re-attach the database. Maximise the Management Studio and right click on Databases and select ‘Attach…’. From here you are presented with another dialog box, click on the Add button and select the new location of the SUSDB that we just moved. Once you have selected the database simply click on Ok and SQL Server will do the rest.

Start the Update Services service and WSUS should be fine and work just as it was before the move.

Fix client machines not appearing in WSUS Console

Depending on your imaging method some clients may not show up on your WSUS console, and refuse to check for updates. Since starting my new job I’ve seen this occur on machines which have been imaged with a non-sysprepped image. I quickly whipped up a script to reset some settings and forcing the machine to contact your WSUS server and retrieve a new Client Id and thus show up in your console.

Dim objShell, strKeyPath, strValueName,strComputer

set objShell = wscript.createObject("wscript.shell")

const HKEY_LOCAL_MACHINE = &H80000002

strComputer = "."

Set objWMIService = GetObject("winmgmts:\\" & strComputer & "\root\cimv2")
Set objRegistry = GetObject("winmgmts:\\" & strComputer & "\root\default:StdRegProv")

strKeyPath = "SOFTWARE\Microsoft\Windows\CurrentVersion\WindowsUpdate"
strValueName = "SUSClientIdReset"


objRegistry.GetStringValue HKEY_LOCAL_MACHINE, strKeyPath, strValueName, dwValue
IF (dwValue = "1") Then
            'do nothing
      Else
            objRegistry.DeleteValue HKEY_LOCAL_MACHINE,strKeyPath,"SusClientId"
            objRegistry.DeleteValue HKEY_LOCAL_MACHINE,strKeyPath,"SusClientIdValidation"

   Set colServiceList = objWMIService.ExecQuery ("Select * from Win32_Service where Name = 'wuauserv'")

   For Each objService in colServiceList
     If objService.State = "Running" Then
     objService.StopService()
     Wscript.Sleep 10000
     objService.StartService()
     End If
   Next
        objShell.Run("wuauclt /resetauthorization /detectnow ")
   	Wscript.Sleep 10000   
        objShell.Run("wuauclt /r /reportnow")

        'Set reg value for SUSClientIdReset for checking against later.
   	dwValue = "1"
        objRegistry.SetStringValue HKEY_LOCAL_MACHINE, strKeyPath, strValueName, dwValue
End If

Run that on the effected machine with Admin Rights and the client will eventually appear in your WSUS Console.

As for the cause, the master image was joined to the domain and tested. During that time received group policy settings which included WSUS and contacted the server settings it’s clientId.

Hope that helps.