Enabling BitLocker with Group Policy and backing up Existing BitLocker recovery keys to Active Directory

So getting BitLocker enabled in an Active Directory environment is fairly painless and helps to get your end user devices more Secure.  I’ll outline the steps you need to take to enable it as well as get the recovery keys stored in Active Directory.  I’ll also dive into replicating this setup on Azure AD/Intune in a future post.

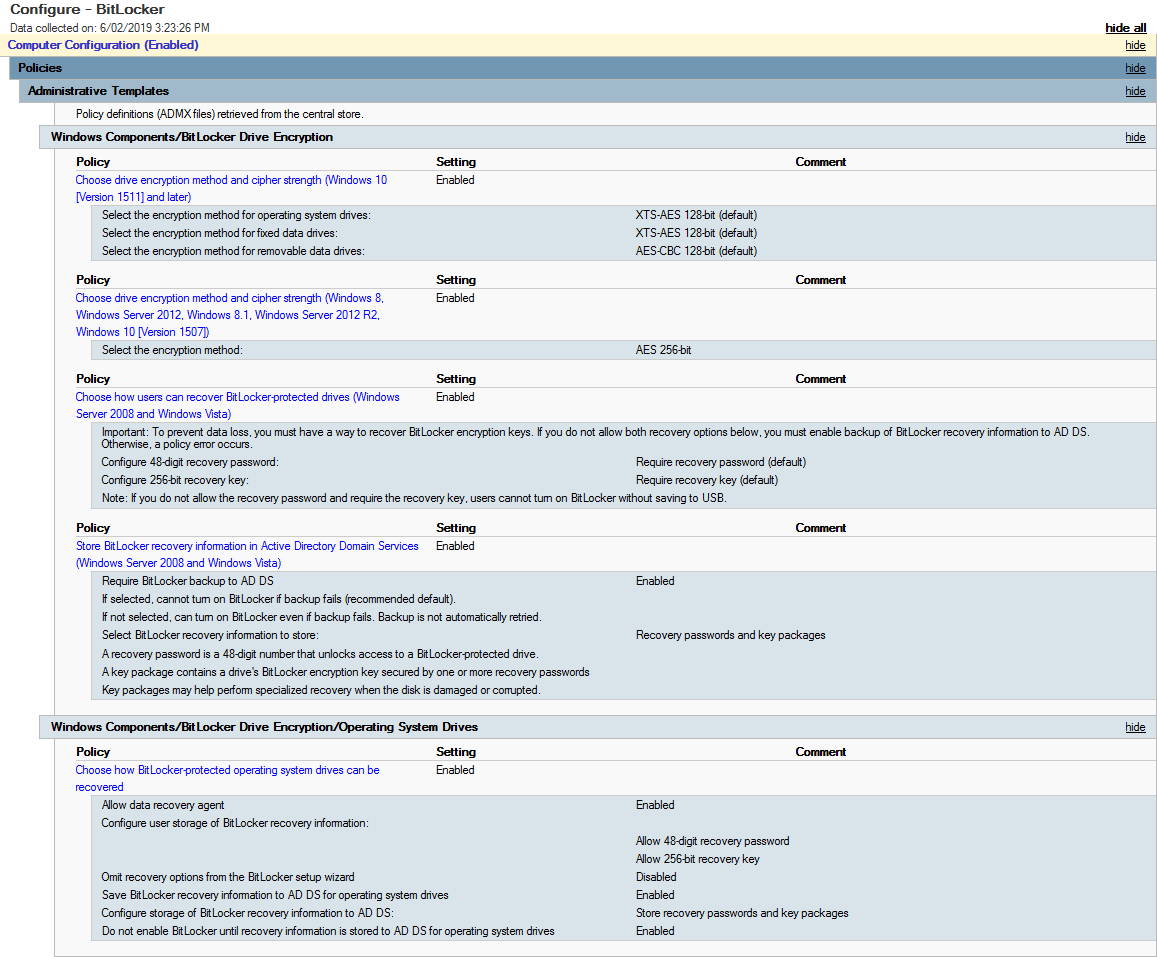
First thing is to create a new GPO (i.e. Configure – BitLocker) – Edit it and navigate to Policies > Administrative Templates > Windows Components > BitLocker Drive Encryption. Enable the following Options:

  • Choose drive encryption method and cipher strength (Windows 10 Version 1511 and later)
  • Choose drive encryption method and cipher strength (Server 2012, Win 8.1 etc…)
  • Choose how users can recover BitLocker protected drives
  • Store BitLocker recovery information in Active Directory Domain Services

Then go down one folder into Operating System Drives and enable the following:

  • Choose how BitLocker protected operationg system drives can be recovered

Once you’ve set this all up, it should look something similar to the image below.

Now target the GPO to some machines and if you’re running 1809 (from what I’ve discovered so far) or later you’ll notice them start the BitLocker process to encrypt automatically.  If not then you may need to check and ensure the TPM is enabled for the device (as we haven’t specified to encrypt devices without a TPM in this case).

What happens if you have already enabled BitLocker but now want to store the recovery keys in Active Directory? With this GPO set it will allow windows to write the recovery key to AD however we need to use the manage-bde utility, that is a command based utility that can be used to configure BitLocker

manage-bde -protectors -get c:
for /f "skip=4 tokens=2 delims=:" %%g in ('"manage-bde -protectors -get c:"') do set MyKey=%%g
echo %MyKey%
manage-bde -protectors -adbackup c: -id%MyKey%

I saved that as a batch file and ran that on the machines that had already been encrypted prior to rolling out the GPO.  Once run, it escrows the key into Active Directory.

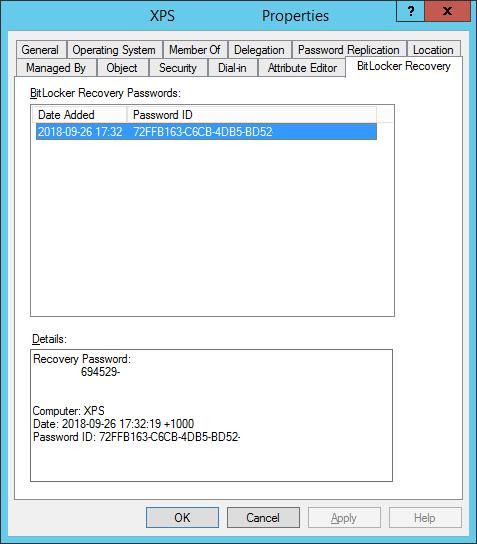
The last bit you will need to do so you can actually see the keys in the Properties tab or via the Search function in Active Directory Users and Computers, ensure that the BitLocker RSAT is enabled in Server Features and Roles.

Windows 10 May 2019 or 1903 Software Update Management Changes for WSUS and Config Manager

We’ve started to deploy the latest release of Windows 10 and it’s interesting to note that Microsoft have released with little fan-fare some changes to the way Updates are deployed for the 1903 release.

Microsoft are now pushing updates through what is called the Unified Update Platform (see this RPC Mag article). Anyway, the main thing is there is now a new product category for WSUS and Config Manager that needs to be configured before your clients will being to receive updates.

You’ll see there is now a Windows 10, version 1903 and later product – make sure that is ticked on your Update Management Tool for updates to by synchronised. Once we had that ticked, for Config Manager you may need to tweak your Automatic Deployment Rule to include additional filters based on how you have it setup.  Microsoft have also blogged about these changes here.

Change Windows 10 Taskbar Icons Script Deploying a custom taskbar for Windows 10

Over the summer holiday period, I was assisting a school with building out an SoE for the new year.  One of the things we used to do with Windows 7 was tweak the Taskbar to contain only items we were after instead of the default items of Internet Explorer, Windows Explorer and Windows Media Player. To do this we implemented a VB Script that would make the changes on the fly.  And since that stopped working I’ve always wanted to sit down and try get it working again for Windows 10 and I’ll now share how I did.

You’ll want to begin by building out your Taskbar layout, add in any icons that you want and when you’re ready we can use a command to extract it.  Alternatively, you can use the sample below to build your own manually, simply reference the location of the shortcuts you want to place in and the order.

<?xml version="1.0" encoding="utf-8"?>
<LayoutModificationTemplate
xmlns="http://schemas.microsoft.com/Start/2014/LayoutModification"
xmlns:defaultlayout="http://schemas.microsoft.com/Start/2014/FullDefaultLayout"
xmlns:start="http://schemas.microsoft.com/Start/2014/StartLayout"
xmlns:taskbar="http://schemas.microsoft.com/Start/2014/TaskbarLayout"
Version="1">
	<CustomTaskbarLayoutCollection PinListPlacement="Replace">
		<defaultlayout:TaskbarLayout>
			<taskbar:TaskbarPinList>
				<taskbar:DesktopApp DesktopApplicationLinkPath="%ALLUSERSPROFILE%\Microsoft\Windows\Start Menu\Programs\Firefox.lnk" />
				<taskbar:DesktopApp DesktopApplicationLinkPath="%APPDATA%\Microsoft\Windows\Start Menu\Programs\System Tools\File Explorer.lnk" />
				<taskbar:DesktopApp DesktopApplicationLinkPath="%ALLUSERSPROFILE%\Microsoft\Windows\Start Menu\Programs\Word.lnk" />
				<taskbar:DesktopApp DesktopApplicationLinkPath="%ALLUSERSPROFILE%\Microsoft\Windows\Start Menu\Programs\Excel.lnk" />
				<taskbar:DesktopApp DesktopApplicationLinkPath="%ALLUSERSPROFILE%\Microsoft\Windows\Start Menu\Programs\Outlook.lnk" />
				<taskbar:DesktopApp DesktopApplicationLinkPath="%ALLUSERSPROFILE%\Microsoft\Windows\Start Menu\Programs\Microsoft SQL Server Tools 17\Microsoft SQL Server Management Studio 17.lnk" />
			</taskbar:TaskbarPinList>
		</defaultlayout:TaskbarLayout>
	</CustomTaskbarLayoutCollection>
</LayoutModificationTemplate>

Now that we have our Layout template ready, it is simply a matter of importing it. We do so by using the Import-StartLayout command. This can also be used to import a Start Menu tile layout however in this case we are only importing the Taskbar layout. Execute the command below (replacing the path with your own).

Import-StartLayout -layoutpath \\MGS-DEPLOY-02\Scripts\TaskbarLayout.xml -Mountpath C:\

Now you can either execute this on a user login, during an MDT Task Sequence or at any other time you want.

For more info around this topic, visit the Microsoft Docs site. Hope that helps.

Setting the default wallpaper on a Windows 10 image deployment through MDT

Action - Set Default WallpaperSo recently I’ve been working on improving and streamlining our imaging process. One of the pain points that I have had with Windows 10 was an easy way of setting the default wallpaper, but without locking out the user, i.e. Group Policy from changing it in the future. After a long session of Google Fu and finding Powershell and VB scripts I settled on a simple solution of a batch file to take ownership and replace the default wallpaper files.

As the majority of our devices are laptops, I set the default img0.jpg to a resolution of 1366 x 768 and then proceeded to create all of the different resolutions in the 4K folder, 1024×768, 1200×1920, 1366×768, 1600×2560, 1920×1200, 2160×3840, 2560×1440, 2560×1600, 3840×2160, 768×1024, 768×1366. Once I had all the images ready, I created a file structure and then made the below batch or cmd file for my Application Install Task. If you are running SCCM instead of just MDT, change Administrators to SYSTEM.

takeown /f c:\windows\WEB\wallpaper\Windows\img0.jpg
takeown /f C:\Windows\Web\4K\Wallpaper\Windows\*.*
icacls c:\windows\WEB\wallpaper\Windows\img0.jpg /Grant Administrators:(F)
icacls C:\Windows\Web\4K\Wallpaper\Windows\*.* /Grant Administrators:(F)
del c:\windows\WEB\wallpaper\Windows\img0.jpg
del /q C:\Windows\Web\4K\Wallpaper\Windows\*.*
copy "%~dp0img0.jpg" c:\windows\WEB\wallpaper\Windows\img0.jpg
copy "%~dp04k\*.*" C:\Windows\Web\4K\Wallpaper\Windows

Once I had everything ready, I created an New Application Install called Action – Set Default Wallpaper and got it to call my batch file. Once that was done, I went and added it into my Task Sequence for building our Windows 10 Image as one of the first items to run once Windows 10 has passed the OOBE stage, so under State Restore, after the Windows Updates.

That process has worked every time flawlessly for me, where as the scripts I had found didn’t.

Issues Deploying a Custom Windows 10 Start Menu Layout when using an image with a Default Profile

So I’m in the final stages of getting our Windows 10 Deployment ready to go and I am currently in the process of branding and customising our image, which includes setting a custom Start Menu Tile Layout.  This is done with the use of two PowerShell commands Export-StartMenuLayout and Import-StartMenuLayout.

I created our preferred start menu, exported on my test computer and then added a Task to our MDT Deployment Task Sequence.

I found that this completed without any errors but Windows was not applying the Start Menu, after a bit of digging around, I found an issue where if you have CopyProfile set to true in your unattend xml answer file then there is another step that you need to complete which is to delete the TileDataLayer folder located in C:\Users\Default\AppData\Local and once I added that line to my batch file the Start Menu appeared.  My complete batch file is as follows;

powershell.exe -ExecutionPolicy Bypass -Command "Copy-Item '%~dp0StartMenu.xml' -destination C:\Windows\Temp; Import-StartLayout -LayoutPath C:\Windows\Temp\StartMenu.xml -MountPath $env:SystemDrive\; Remove-Item C:\Windows\temp\StartMenu.xml -Force"
rmdir C:\Users\Default\AppData\Local\TileDataLayer /q /s

Hope that helps.