Hide the Bing button in Edge

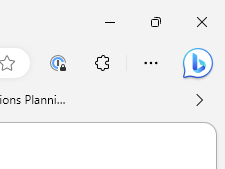
I’m not a fan of the Bing button that now appears in Edge. Microsoft seem to have rushed it out as there isn’t an easy way to remove it. We’ll do this via a registry key (that can also be deployed via Group Policy)

Close out of Microsoft Edge completely and open the Registry Editor and navigate to HKEY_LOCAL_MACHINE\SOFTWARE\Policies\Microsoft. Right-click on the Microsoft folder and select New > Key from the context menu to create a new Key and name it Edge. Enter the Edge folder and then right-click an empty area on the right and choose New> Dword (32-bit) value, name this value HubsSidebarEnabled . Its default value is 0, which is correct. Now close Regedit and open Microsoft Edge again and navigate to edge://policy and click on the Reload Policies button that appears – the button should disappear.

As of Edge version 114 (Edge Dev Channel) users can do this via Edge settings and navigate to Sidebar > App and notification settings > Discover and then Disable the Show Discover toggle at the top.

Fixing Maximum connections reached by Clearing Connected Sessions on an APC UPS

I was trying to log into an APC UPS with the correct login but still received an error, The maximum number of web connections has been reached or simply Maximum connections reached. Knowing I had the right login credentials, and that no one else was logged into, I was a little perplexed.  There is a straight forward fix but can be a little annoying. 

Open up your favorite SSH client and connect via SSH to the APC or Schneider Electric Network device. Login using the configured username or password, or default of apc and apc.  Once logged into the console, we’ll issue some commands to list the current sessions and then use the -d switch to “disconnect” a few. I’ll point out the last session via Telnet is usually you so don’t disconnect it.

session
session -d 153

Commands are based on the image, simply change the session number to suit. Once you have cleared all the commands, you should be able to login to the web interface without issues.

Get the last Reboot or Shutdown reason and user from the Windows Event Log

Start by going into Event Viewer (Windows+R or the Start Menu and type eventvwr.msc).  Navigate to the System Log under Windows, we then want to use Filter Current Log to allow us to only show Events with certain attributes (such as Source or IDs).

In our case, we want to filter on Event Source: USER32.  Then for Event IDs we want to see only 1074.  If you are after unexpected shutdowns, use 6008.  Once that’s in (like the pic on the right), click OK and this will filter the event log based on our requirements. You can scroll through and see what and who initiated a shutdown.

Copying files from one server to another as a different user (two separate domains) using PowerShell

I’ve been working on needed to copy a number of files from one client site to another, my issue is that they have separate Active Directory domains and there is no trust between them. Using PowerShell, we can save a user credential and then use that to map a network drive with them and perform our copy.

We will setup the credential to be stored in a text file, although a cool feature of PowerShell it’s very limited in that it can only be decrypted by the user who created it on the same local machine (which is fine for our needs). The following cmdlet will prompt for a string to encrypt, which in this case is our password.

Read-Host -ASSecureString | ConvertFrom-SecureString | Out-File E:\Scripts\password.txt

Once done, we will build up our PowerShell script that will read the file, map a network drive via PowerShell which will use the secure credentials and then copy across our files.

$password = Get-Content E:\Scripts\password.txt | ConvertTo-SecureString
$credentials = new-object -typename System.Management.Automation.PSCredential -argumentlist "domain\username",$pass

New-PSDrive -Name Z -PSProvider filesystem -Root "\10.15.2.5\Baseline$" -Credential $creds
Remove-Item -Path Z:\ -filter *.bak
Copy-Item -filter *.bak E:\Backup -Destination Z:\ -ErrorAction SilentlyContinue -ErrorVariable A
Remove-PSDrive Z

The script copies files, and is a quick and dirty way to get files from a server in one domain to another without any sort of trust.

Using PowerShell to Manage Windows Server DNS entries

Firstly, Happy new year. Anyway, I was recently tasked with creating a large number of DNS entries on our internal DNS servers. To accomplish this I decided to use PowerShell to perform an import of a CSV file that I had been given that already had my DNS entries. There was a header row with HostName and IPAddress as columns and then dozens of lines entries that needed to become DNS A Records on our server.

So the first command I used to Import these records was the below (replace adatum.com.au with your DNS zone) and DNSentries.csv with your filename.
Import-CSV C:\Scripts\DNSentries.csv | %{ Add-DNSServerResourceRecordA -ZoneName adatum.com.au -Name $_."HostName" -IPv4Address $_."IPAddress" }

After completing that I noticied that some had a typo (the file was given to me) so instead of going in and manually removing the ones that were wrong, I again used PowerShell to remove them with the following command:
Import-CSV C:\Scripts\DNSentries.csv | %{ Remove-DnsServerResourceRecord -ZoneName "adatum.com.au" -RRType "A" -Name $_."HostName" -RecordData $_."IPAddress" }

Using the above commands you can quickly and easily add or remove DNS entries from your Windows Server DNS Infrastructure using entries from a CSV file.