Getting back the OneNote 2010 Printer by Installing a generic printer driver, and then configure it for Microsoft Office OneNote 2010

So we had a few users delete their OneNote printer from the Printers List in Windows.  OneNote is a great program and is bolstered by the use of the printer allowing you to push pretty much anything into OneNote. We ran an office repair but the printer didn’t actually return for our users, so I started looking at how the OneNote printer is configured and created a new instance of the printer.  The following is basically a walk through of installing and configuring a local printer for OneNote 2010 (also applies to OneNote 2007).

First off we need to install the generic printer driver in Windows. To do this, follow these steps:

  1. Click Start, type printers in the Start Search box, and then click Devices and Printers in the Programs list.
  2. On the left side of the page near the top, click Add a printer.
  3. In the Add Printer dialog box, click Add a local printer.
  4. Click to select the Use an existing port option, select the appropriate port, and then click Next. For example, you can select LPT1.
  5. Under Manufacturer, select Generic, select Generic / Text Only under Printers, and then click Next.
  6. If you receive a message about drivers, click to select the Use the driver that is currently installed (recommended) option, and then click Next:
  7. Click Next, and then click Finish.

So now how do we go about configuring this newly installed generic printer for use with OneNote, follow these instructions for doing that:

  1. In the printer list, right-click the Generic / Text only printer, and then click Printer Properties.
  2. Click the Ports tab, and then click to select the Send To Microsoft OneNote Port check box.
  3. Click the Advanced Tab, select Send to Microsoft OneNote Driver in the Driver list, and then click Print Processor.
  4. Under Print processor, select winprint, select RAW under Default data type, and then click OK.
  5. Click the General tab, change the name of the printer to Send To OneNote 2010, and then click OK.

And now we can finally use the printer to submit pretty much anything to OneNote 2010.  We didn’t really learn why the Office repair didn’t re-add the printer as the research we found on the internet led us to believe that it would add the printer, but just in case it doesn’t you now know how to manually add it.
Blank page (auth.owa Http 500) when logging into Outlook Web Access running on Exchange 2010

Recently had to restart a client’s server after running some Windows Updates. A few hours after the restart the client contacted me stating that they couldn’t access their e-mails via the web.  I quickly had a look, the login page presented itself, so I logged in and after clicking Sign in I was presented with a blank page pointing to auth.owa.  This was a little puzzling as there were no updates for Exchange so why did it break?  Checking the IIS logs, I found that the error was 500 which indicated some kind of authentication error.

A little powershell cmdlet you can run is Test-OWAConnectivity. So I ran the cmdlet and recieved WARNING: An unknown failure occurred during logon. So I checked IIS and ensured that all of the authentication was set correctly and indeed it was.  So after some poking around on the web I found out Exchange 2010 palms off the Forms Based Authentication to a seperate Service called  Microsoft Exchange Forms-Based Authentication Service. Starting this service fixed the blank page issue and allowed clients to authenticate correctly.

Security warning when you start Outlook 2007 and then connect to a mailbox that is hosted on a server that is running Exchange Server 2007 or Exchange Server 2010: “The name on the security certificate is invalid or does not match the name of the site”

I recently setup a SBS 2011 server for one of my clients. For several reasons we changed the external name to reach the server so instead of remote.fdqn.com.au it would be exchange.fqdn.com.au this worked perfectly once DNS settings propagated and allowed employees to connect externally via webmail or Outlook Anywhere (one of the best features in exchange/outlook hands down).  One issue which popped up after we installed the certificate for this new domain is that it was assigned to a different domain than what was configured in Exchange 2010, so internally clients would get security pop-ups everytime they would open their outlook.

The fix requires the use of the Exchange PowerShell Console, so fire it up. Once it loads, we first need to know what the name of our client access server is (for sites with multiple CAS servers you need to use this on the server doing your auto-discovery). So run Get-ClientAccessServer which will list all of the available CAS servers, for this instance it is SBSSERVER. So now that we have a list of servers and we know which is doing the auto-discovery we need to re-configure it to the new DNS entry.  Microsoft documentation doesn’t have ” ” quotation marks but it is important to have. So now run Set-ClientAccessServer with the following
Set-ClientAccessServer -Identity "SBSSERVER" -AutoDiscoverServiceInternalUri "https://exchange.fqdn.com.au/autodiscover/autodiscover.xml" with SBSSERVER being your CAS server and fqdn.com.au being the correct domain the certificate is assigned to.

Once the command runs successfully, re-open outlook and you will no longer be presented with a security warning everytime you are on the internal network.

Office 2010 and Windows Sysprep Adventures

For our new roll out next year, we are deploying Microsoft Office 2010 and using KMS as our licensing method. Througthe use of sysprep’s generalize command, Windows will flush its Activation Status and associated hardware ID as well as rearming the activation state to its fresh install state (grace period).

With the introduction of Office 2010 brings improved piracy protection.  On our test deployment we found that our KMS Client count for Office 2010 wasn’t increasing and therefore wouldn’t reach the required count of 5 for activation, what was going on!  After a little bit of digging and the use of the Office 2010 Software Protection VB Script (ospp.vbs under the Office14 folder) we were able to see that the five of our test machines had the same CMID, therefore KMS thought that each was the same client. After a quick look through Technet we found out the issue.  When you run an Office Product it would automatically attempt to activate via KMS. Our Office installer also had its own activate upon installation command as well.

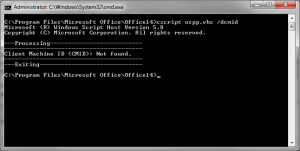
The fix for this issue and getting the count to increase (and finally activate) was to run a re-arm utility provided under program files (or program files x86, depending on your installed flavor):OSPP with DCMID

C:\Program Files\Common Files\Microsoft Shared\OfficeSoftwareProtectionPlatform\ospprearm.exe

Running the utility under an elevated command prompt will then show completed successfully. If you wish to double check you can then run ospp.vbs with the /dcmid switch and find that there is now no Client Machine ID.

Once this is compelte, run your sysprep as you would and you will find that for each client that you activate from now on for your KMS will increase your count.  You will also find that if you have some clients with the same ID then they will also all activate.

I plan on having some other articles covering articles regarding Windows 7 sysprep so stay tuned.