Change Windows 10 Taskbar Icons Script Deploying a custom taskbar for Windows 10

Over the summer holiday period, I was assisting a school with building out an SoE for the new year.  One of the things we used to do with Windows 7 was tweak the Taskbar to contain only items we were after instead of the default items of Internet Explorer, Windows Explorer and Windows Media Player. To do this we implemented a VB Script that would make the changes on the fly.  And since that stopped working I’ve always wanted to sit down and try get it working again for Windows 10 and I’ll now share how I did.

You’ll want to begin by building out your Taskbar layout, add in any icons that you want and when you’re ready we can use a command to extract it.  Alternatively, you can use the sample below to build your own manually, simply reference the location of the shortcuts you want to place in and the order.

<?xml version="1.0" encoding="utf-8"?>
<LayoutModificationTemplate
xmlns="http://schemas.microsoft.com/Start/2014/LayoutModification"
xmlns:defaultlayout="http://schemas.microsoft.com/Start/2014/FullDefaultLayout"
xmlns:start="http://schemas.microsoft.com/Start/2014/StartLayout"
xmlns:taskbar="http://schemas.microsoft.com/Start/2014/TaskbarLayout"
Version="1">
	<CustomTaskbarLayoutCollection PinListPlacement="Replace">
		<defaultlayout:TaskbarLayout>
			<taskbar:TaskbarPinList>
				<taskbar:DesktopApp DesktopApplicationLinkPath="%ALLUSERSPROFILE%\Microsoft\Windows\Start Menu\Programs\Firefox.lnk" />
				<taskbar:DesktopApp DesktopApplicationLinkPath="%APPDATA%\Microsoft\Windows\Start Menu\Programs\System Tools\File Explorer.lnk" />
				<taskbar:DesktopApp DesktopApplicationLinkPath="%ALLUSERSPROFILE%\Microsoft\Windows\Start Menu\Programs\Word.lnk" />
				<taskbar:DesktopApp DesktopApplicationLinkPath="%ALLUSERSPROFILE%\Microsoft\Windows\Start Menu\Programs\Excel.lnk" />
				<taskbar:DesktopApp DesktopApplicationLinkPath="%ALLUSERSPROFILE%\Microsoft\Windows\Start Menu\Programs\Outlook.lnk" />
				<taskbar:DesktopApp DesktopApplicationLinkPath="%ALLUSERSPROFILE%\Microsoft\Windows\Start Menu\Programs\Microsoft SQL Server Tools 17\Microsoft SQL Server Management Studio 17.lnk" />
			</taskbar:TaskbarPinList>
		</defaultlayout:TaskbarLayout>
	</CustomTaskbarLayoutCollection>
</LayoutModificationTemplate>

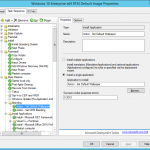
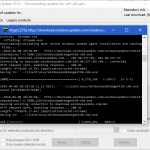
Now that we have our Layout template ready, it is simply a matter of importing it. We do so by using the Import-StartLayout command. This can also be used to import a Start Menu tile layout however in this case we are only importing the Taskbar layout. Execute the command below (replacing the path with your own).

Import-StartLayout -layoutpath \\MGS-DEPLOY-02\Scripts\TaskbarLayout.xml -Mountpath C:\

Now you can either execute this on a user login, during an MDT Task Sequence or at any other time you want.

For more info around this topic, visit the Microsoft Docs site. Hope that helps.

Setting the default wallpaper on a Windows 10 image deployment through MDT

Action - Set Default WallpaperSo recently I’ve been working on improving and streamlining our imaging process. One of the pain points that I have had with Windows 10 was an easy way of setting the default wallpaper, but without locking out the user, i.e. Group Policy from changing it in the future. After a long session of Google Fu and finding Powershell and VB scripts I settled on a simple solution of a batch file to take ownership and replace the default wallpaper files.

As the majority of our devices are laptops, I set the default img0.jpg to a resolution of 1366 x 768 and then proceeded to create all of the different resolutions in the 4K folder, 1024×768, 1200×1920, 1366×768, 1600×2560, 1920×1200, 2160×3840, 2560×1440, 2560×1600, 3840×2160, 768×1024, 768×1366. Once I had all the images ready, I created a file structure and then made the below batch or cmd file for my Application Install Task. If you are running SCCM instead of just MDT, change Administrators to SYSTEM.

takeown /f c:\windows\WEB\wallpaper\Windows\img0.jpg
takeown /f C:\Windows\Web\4K\Wallpaper\Windows\*.*
icacls c:\windows\WEB\wallpaper\Windows\img0.jpg /Grant Administrators:(F)
icacls C:\Windows\Web\4K\Wallpaper\Windows\*.* /Grant Administrators:(F)
del c:\windows\WEB\wallpaper\Windows\img0.jpg
del /q C:\Windows\Web\4K\Wallpaper\Windows\*.*
copy "%~dp0img0.jpg" c:\windows\WEB\wallpaper\Windows\img0.jpg
copy "%~dp04k\*.*" C:\Windows\Web\4K\Wallpaper\Windows

Once I had everything ready, I created an New Application Install called Action – Set Default Wallpaper and got it to call my batch file. Once that was done, I went and added it into my Task Sequence for building our Windows 10 Image as one of the first items to run once Windows 10 has passed the OOBE stage, so under State Restore, after the Windows Updates.

That process has worked every time flawlessly for me, where as the scripts I had found didn’t.

PowerShell Script to Install Updates Offline in a WIM image using DISM

WSUS Offline Downloader in actionI’ve been helping out a customer build a new MDT deployment environment and move away from Ghost and the 90’s. As they are not going to be implementing Systems Center Configuration Manager and SUP to automatically maintain their images offline any time soon, we need a way to keep their image up to date with updates, without having to re-build it every time.

I knew you could already do offline servicing with DISM but wanted to make it nice and easy for them. I’m using WSUS Offline Update to download all of the updates in one shot, you could also use WUD but their lists haven’t been updated for a while.  I copied the zip and extracted it to their deployment server and downloaded all of the updates for Windows 7 x64 SP1 and saved them all to a single updates folder. I then built up the below PowerShell script to offline service their image and apply the updates downloaded.

$UpdatesPath = "E:\Updates\*"
$MountPath = "E:\MDTDeploymentShare\Operating Systems\W7X64SP1\Mount"
$WimFile = "E:\MDTDeploymentShare\Operating Systems\W7X64SP1\REFW7X64.wim"

DISM /Mount-Wim /WimFile:$WimFile /index:1 /Mountdir:$MountPath
$UpdateArray = Get-Item $UpdatesPath
ForEach ($Updates in $UpdateArray)
{
DISM /image:$MountPath /Add-Package /Packagepath:$Updates
Start-Sleep –s 5
}
Write-Host "Updates Applied to WIM"
DISM /Unmount-Wim /Mountdir:$MountPath /commit
DISM /Cleanup-Wim

If you have 100+ updates this process can take a while so sit back and drink a coffee while you run the script. Hope that helps.