Windows 10 May 2019 or 1903 Software Update Management Changes for WSUS and Config Manager

We’ve started to deploy the latest release of Windows 10 and it’s interesting to note that Microsoft have released with little fan-fare some changes to the way Updates are deployed for the 1903 release.

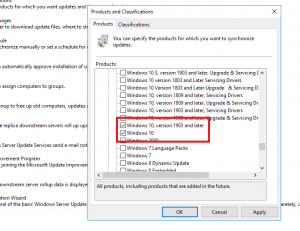
Microsoft are now pushing updates through what is called the Unified Update Platform (see this RPC Mag article). Anyway, the main thing is there is now a new product category for WSUS and Config Manager that needs to be configured before your clients will being to receive updates.

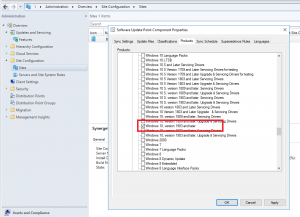
You’ll see there is now a Windows 10, version 1903 and later product – make sure that is ticked on your Update Management Tool for updates to by synchronised. Once we had that ticked, for Config Manager you may need to tweak your Automatic Deployment Rule to include additional filters based on how you have it setup.  Microsoft have also blogged about these changes here.

Fixing the randomly stopping WsusPool IIS Application pool and Windows Updates failed 0x80244022 error

I was recently assisting a client with an upgrade of their Configuration Manager (SCCM) environment up to the latest release of 1702 and as part of that we’re also going over it’s currently deployed functionality and making sure it all works. They recently noted that clients were no longer receiving updates and ran the Software Update functionality of ConfigMgr, which funnily enough also relies on WSUS to sync up to Microsoft (but not push out the updates themselves).

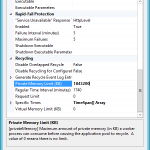
So when troubleshooting Updating issues, you need to check both the Software Update Point and WSUS, and lowe and behold the WSUS console kept on crashing. After checking the Update Services service, I then turned to IIS and noticed the UpdatedServices Application pool had stopped, so I started it and went back into the console but soon noticed it had died again. After reading some advice on the TechNet forums they suggested raising the memory limit of the Wsus Application Pool, which is done by selecting the Application Pool Name and then clicking Advanced on the right hand side or right click menu. Scroll down to the bottom of the Advanced Settings Window until you see Private Memory Limit (KB) and increase this from the default of 1843200 (which is 1.8 GB) to 4194304 (which is 4 GB). Make sure you have enough RAM allocated to the machine, if you are feeling courageous you can also set the value to 0 which does not set a limit.

After increasing the available memory to the AppPool, WSUS synchronized successfully and clients were now receiving updates

How to remove the Open File Security Warning Prompt during Driver Deployment or User Login when using MDT or SCCM

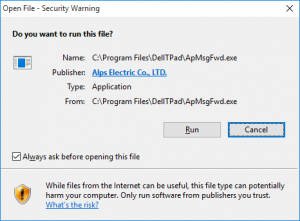
Security Warning with DriversDuring a deployment of Windows or even after Windows is deployed you see an Open File – Security Warning prompt when a .EXE runs (similar to the one on the right).

This happens because when you download an .EXE, .ZIP, or .CAB Internet Explorer (as well as Firefox and Chrome) saves what is called a Zone Identifier, telling the Operating System the file came from the internet and not a trusted zone.  In certain deployments this can happen several times when a user logs in to load all of the applications into the system tray, some of them being igfxtray.exe, apmsgfwd.exe, apntex.exe, apoint.exe, gfxui.exe, hidfind.exe, hkcmd.exe, igfxpers.exe.

To get around this we need to remove the ZoneIdentifier, we can use a small utility from SysInternals to do it.  Download Streams, copy it to your MDT or SCCM Server and run the following changing the path to a location containing your drivers;

streams.exe -s -d "E:\MDTDeploymentShare\Out-Of-Box Drivers"

Make sure you run that in an Administrative command prompt and accept the license agreement on the first run. Hope that helps.

Getting a machine product name and serial number using WMIC for use with MDT or SCCM

wmic csproduct get name outputQuick post today, I organise my driver folders into manufacturer and model and then use a task sequence to pick machine specific drivers. Getting the exact model name helps and one day to do that is via a WMI query. It’s a command I try to use quite a bit (and tend to forget the command half the time).

wmic csproduct get name

The result should give you the exact name returned by WMI and allow you to use it as a variable in your task sequence. Then, just plug in your model you are targeting into an MDT or SCCM task sequence condition. For an SCCM example;

SELECT * FROM Win32_ComputerSystem WHERE Model LIKE "%OptiPlex 9020%"

Another useful one is;

wmic bios get serialnumber

This one shows the machine serial number and if you’re not using SCCM can be useful for warranty claims.

Backup MySQL Databases running on a Windows Server using Systems Center Data Protection Manager (DPM) 2012.

Running MySQL on a Windows machine is pretty straight forward.  One of the down sides though is that MySQL is not VSS aware and may mis-behave when back up software such as Data Protection Manager or ShadowProtect.  Data Protection Manager (DPM) has the ability (basically called Pre-Backup and Post-Backup Scripts) to perform actions before and after a backup run.

After installing the DPM Protection Agent onto the computer you want to run the protect (by default its %ProgramFiles%\Microsoft Data Protection Manager\DPM) You’ll find a Scripting Folder and inside a ScriptingConfig.xml file which should only contain XML Schema data, we will want to expand on this by adding the following lines inside ScriptConfiguration

   <DatasourceScriptConfig DataSourceName="Data source">
     ”Path\Script Parameters” 
     "Path\Script Parameters” 
     30

DataSourceName needs to be the name of the Data Source that you are protecting (matching in DPM Console) for example C:\MySQL_Backup and in our case we only want to use a PreBackupScript (ie C:\MySQL_Backup\BackupDB.cmd) which will dump a backup from our MySQL Databse into a single SQL file before the actual DPM Backup event.  As an example, the following will execute a backup for MySQL.  You will need to change -User -Password and the MaharaProd to something that suits your environment.

@echo off
set CurrentDate=%date:~-10,2%_%date:~7,2%_%date:~-4,4%
move /y C:\MySQL_Backup\Mahara-*.sql C:\MySQL_Backup\PreviousBackup.sql
mysqldump –user backupuser –password=changethis MaharaProd > C:\MySQL_Backup\Mahara-%CurrentDate%.sql

The above will output a Mahara-DD_MM_YYYY.sql file as well as make a Previous Backup before allowing DPM to go ahead and create the restore point.

Check out this TechNet article for more details on how to get this running.

Setting up an SPN and fixing the cannot verify the service principal name error when installing ForeFront Endpoint Protection

We are currently in the process of trailing Forefront Endpoint Security along with our SCCM Deployment.  So after a few weeks of tweaking we have got our systems center deployment to a level where we are happy with it, it was time to begin installing and testing Forefront.

After beginning our installing and answering a few questions the setup begins to validate some per-requisites. Apart from having reporting services installed and configured on a SQL Server you also need to have the service account for SQL Server to be publishing its existence via a Service Principal Name or SPN. If the account doesn’t have a valid SPN entry then you will receive the following message during the per-requisites check of the Forefront setup.

Setup cannot verify the service principal name (SPN) for this account.
Ensure that there is a single valid SPN entry for this account in the
Active Directory Domain Services.

So how do we go about adding an SPN entry. We will use sqlservice as our user account. We can either do this via ADSIedit or the command prompt. Open up an elevated command prompt and enter the following command:

setspn -a MSSQLSvc/sqlserver.fqdn domain\sqlservice

with MSSQLSvc being the protocol, sqlserver the name of the Server hosting SQL Services along with your fully qualified domain name and finally the account you wish to add the SPN entry for. To check that you have successfully added the spn you can do the following:

setspn -l domain\sqlservice

which will list the account along with SPNs being advertised for that particular account.

The quicker way would be to run ADSIedit, find the account you wish to add the SPN for, right click and go properties and then under the attribute editor. From there navigate down the list until you find servicePrincipalName and click edit. You can then enter the SPN in the same format as above, which is:

MSSQLSvc/sqlserver.fqdn

And there you have it, you can continue to install Forefront without any issues so long as you meet the other requirements of the setup.

Fixing SMS Site Component Manager could not access site system. Access is denied. Issue when adding SCCM components to other servers.

I recently decided to move our reporting services running on our SCCM site server to our more beefier SQL Server, I was also wanting to do this for our Forefront Migration (as Reporting services is a requirement). So I created a new server under Site Settings -> Site Systems and put our SQL server into there. I then added the ConfigMgr Reporting Point and Reporting services point with SCCM adding in Component Server and Site System into the roles.

After a little while I then checked the Site Component Manager logs and found the following error:

SMS Site Component Manager could not access site system "<servername>".
The operating system reported error 2147942405: Access is denied.

So I went looking to make sure that the server was up, and our Administrator account had local machine rights, it was there.

After some further investigation I also found out that the SCCM site server also needs administrative rights, so I added the computer to the local administrator group and restarted the site component manager to force it to retry installing the components and the error disappeared and SCCM began installing the components onto our SQL Server.