How to Multicast a Ghost image (GhostCast) using the Altiris Deployment Console 6.9

We recently needed to image a large number of machines in a short amount of time.  Anyone who has dealt with Altiris and use Ghost as their method of imaging know that Altiris wont by default Multicast the image and will instead push it out individually to each client that connects. So here is a little tip on getting your images pushed out via Multicast.

When you have created your imaging job, enter the properties of the imaging task and replace %IMAGE_FILENAME% to @MCSESSION with SESSION being the name of the GhostCast session we will create in the next step.
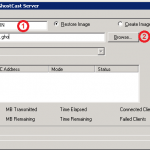
Now that we have configured the job to tell Ghost to connect to our GhostCast session it is time to start up GhostCast (which can be found under <DS installed path>\Ghost\GhostSrv.exe). Once the window is open we can say that we are going to restore an image and now select the Ghost image that we want to restore (Usually under<DS installed path>\Images\OperatingSystem\..) and now select Accept Clients. Now that we are ready to image, we can boot the computers we want to image into automation and run the imaging job we configured earlier to them. Click on the image to the right to see what your GhostCast window should look like.

Now you will see once they have booted up and started the modified imaging job that they will be at the Symantec Ghost screen waiting for a GhostCast session to start.  We now simply need to go into GhostCast and start sending out the image.  You can see that all of the clients have also appearing in our GhostCast window.
Fixing LiveUpdate was unable to find any products to update error when running Live update for Backup Exec 2010

I recently performed an install of Backup Exec 2010 R3 for a client, after doing the install and setting up the shiny new LTO-5 tape drive I decided it would be best to run LiveUpdate to make sure we were running the latest release. So I open up Backup Exec console, navigate to Tools and click on LiveUpdate. The window opens up and then errors out with LU1805: LiveUpdate was unable to find any products to update. How can this be, I just installed Backup Exec and I’m already having problems. Luckily the solution is simple. Make Backup Exec register itself with LiveUpdate (or you could un-install/re-install live update and take your chances).

Open up a dos console with administrative privileges and navigate to the Backup Exec installation folder (default c:\program files\symantec\backup exec\). When you are there run the following command:

BeUpdateOps -Addbe -OptOut

This will cause backup Exec to register itself with LiveUpdate . After about 10 seconds you will get a message saying that it Successfully registered Backup Exec with LiveUpdate and set the mode to OptOut.

You should now be able to run LiveUpdate and be able to see Backup Exec in the list of applications to update.

Speeding up LAN based Automation OS boot times using a Custom TFTP Server for Altiris (for WinPE and Linux)

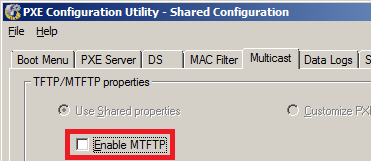
One of the more easier ways of speeding up your WinPE boot times via PXE are changing the default TFTP server which comes with Altiris. First of all, open up the PXE Configuration Manager and disable Multicast since the WinPE image cannot be transferred over Multicast anyway(only DOS supports Multicast via TFTP). This simple tweak shaves around a second off your PXE Boot time.
Another tweak which can be performed is changing the TFTP Server itself. This sounds quite difficult but is quite easy to accomplish and is a significant benefit.  My own testing has shown that 10 Clients concurrently loading a WinPE image do it around 45-50% faster using another TFTP Server than if I was to continue using Altiris’s own server.

I was also going to cover compressing the WinPE image to reduce its file size, but found thatwhen doing so, the reduction in size was minimal shaving off around 10mb.

I’ll be using the Open Source Open TFTP Server, available from http://sourceforge.net/projects/tftp-server/. Download it and install it either on your Altiris Server or like I did, on my workstation and then copy it over to your server. You will also need to copy over your Settings file.

Firstly, open up the Services control applet and Stop the Altiris PXE MTFTP Server service.

Now comes the good part. Open an elevated command prompt. The following is based on our Altiris setup, with it installed on D drive and me creating a folder under PXE for OpenTFTP and pasting the OpenTFTP executable and Settings file into that folder.

sc config "Altiris PXE MTFTP Server" binpath= "D:\Deployment Server\PXE\OpenTFTP\OpenTFTPServerMT.exe"

That will reconfigure the MTFTP service path that Altiris uses to push out files from the Altiris supplied MTFTP to our Open TFTP server. You can go into the Services control applet and start the Altiris MTFTP service to begin using the new executable.

To try and get the most out of OpenTFTP server, have a play with the Settings file, primarly the blksize option. Ours is set to 1456 and can be changed depending on your network environment.

If for any chance you want to return to the Altiris MTFTP server then you simply need to run the sc config command pointing to your Altiris PXE MTFTP executable so stop the service again and enter the following into an elevated command prompt making sure to match the path to your Altiris location:

sc config "Altiris PXE MTFTP Server" binpath= "D:\Deployment server\PXE\PxeMtftp.exe"

Then start the service again and you are back to using the default Altiris multi-thread TFTP server.

This simple tweak shaves heaps of time off of WinPE (also Linux) automation boot times. If you are running the Dos based automation then there isn’t really a need to run this tweak as the transfer is small enough not to take long anyway.

Hope that helps.

BackupExec unable to read or write to the Database

Today when checking one of the servers I manage, I got an error when opening up the BackupExec 12.5 management console. The error was “Unable to read or write to the Database” which I found a bit puzzling. I checked to make sure SQL Server which hosted the BE database was running, and it was.

After having a quick look in the Application Event Log, I found an error relating to the issue I was experiencing. Event ID: 33152.  Thankfully the fix for this error is quite simple.

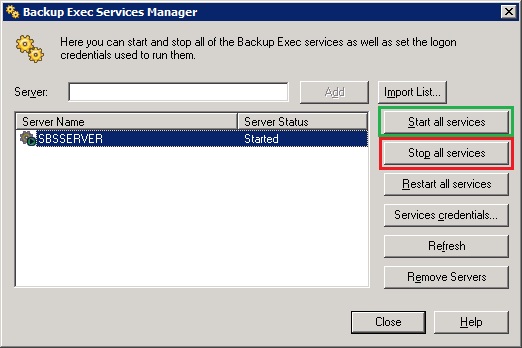
Open up the Backup Exec Services Manager and click on Stop All Services. Now open up the SQL Server Configuration Manager and restart the instance of SQL Server hosting your Backup Exec database. Once it restarts, return to the Backup Exec Services Manager and click on Start All Services to start them all up again. Once they’re up, open the management console.  If all went well it should now log you in successfully and show you the current status of your server.