Copying files from one server to another as a different user (two separate domains) using PowerShell

I’ve been working on needed to copy a number of files from one client site to another, my issue is that they have separate Active Directory domains and there is no trust between them. Using PowerShell, we can save a user credential and then use that to map a network drive with them and perform our copy.

We will setup the credential to be stored in a text file, although a cool feature of PowerShell it’s very limited in that it can only be decrypted by the user who created it on the same local machine (which is fine for our needs). The following cmdlet will prompt for a string to encrypt, which in this case is our password.

Read-Host -ASSecureString | ConvertFrom-SecureString | Out-File E:\Scripts\password.txt

Once done, we will build up our PowerShell script that will read the file, map a network drive via PowerShell which will use the secure credentials and then copy across our files.

$password = Get-Content E:\Scripts\password.txt | ConvertTo-SecureString
$credentials = new-object -typename System.Management.Automation.PSCredential -argumentlist "domain\username",$pass

New-PSDrive -Name Z -PSProvider filesystem -Root "\10.15.2.5\Baseline$" -Credential $creds
Remove-Item -Path Z:\ -filter *.bak
Copy-Item -filter *.bak E:\Backup -Destination Z:\ -ErrorAction SilentlyContinue -ErrorVariable A
Remove-PSDrive Z

The script copies files, and is a quick and dirty way to get files from a server in one domain to another without any sort of trust.
Issues Deploying a Custom Windows 10 Start Menu Layout when using an image with a Default Profile

So I’m in the final stages of getting our Windows 10 Deployment ready to go and I am currently in the process of branding and customising our image, which includes setting a custom Start Menu Tile Layout.  This is done with the use of two PowerShell commands Export-StartMenuLayout and Import-StartMenuLayout.

I created our preferred start menu, exported on my test computer and then added a Task to our MDT Deployment Task Sequence.

I found that this completed without any errors but Windows was not applying the Start Menu, after a bit of digging around, I found an issue where if you have CopyProfile set to true in your unattend xml answer file then there is another step that you need to complete which is to delete the TileDataLayer folder located in C:\Users\Default\AppData\Local and once I added that line to my batch file the Start Menu appeared.  My complete batch file is as follows;

powershell.exe -ExecutionPolicy Bypass -Command "Copy-Item '%~dp0StartMenu.xml' -destination C:\Windows\Temp; Import-StartLayout -LayoutPath C:\Windows\Temp\StartMenu.xml -MountPath $env:SystemDrive\; Remove-Item C:\Windows\temp\StartMenu.xml -Force"
rmdir C:\Users\Default\AppData\Local\TileDataLayer /q /s

Hope that helps.

How to remove the Open File Security Warning Prompt during Driver Deployment or User Login when using MDT or SCCM

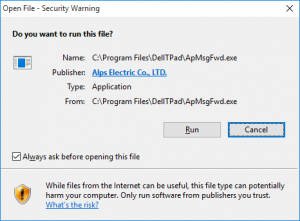
Security Warning with DriversDuring a deployment of Windows or even after Windows is deployed you see an Open File – Security Warning prompt when a .EXE runs (similar to the one on the right).

This happens because when you download an .EXE, .ZIP, or .CAB Internet Explorer (as well as Firefox and Chrome) saves what is called a Zone Identifier, telling the Operating System the file came from the internet and not a trusted zone.  In certain deployments this can happen several times when a user logs in to load all of the applications into the system tray, some of them being igfxtray.exe, apmsgfwd.exe, apntex.exe, apoint.exe, gfxui.exe, hidfind.exe, hkcmd.exe, igfxpers.exe.

To get around this we need to remove the ZoneIdentifier, we can use a small utility from SysInternals to do it.  Download Streams, copy it to your MDT or SCCM Server and run the following changing the path to a location containing your drivers;

streams.exe -s -d "E:\MDTDeploymentShare\Out-Of-Box Drivers"

Make sure you run that in an Administrative command prompt and accept the license agreement on the first run. Hope that helps.

Getting a machine product name and serial number using WMIC for use with MDT or SCCM

wmic csproduct get name outputQuick post today, I organise my driver folders into manufacturer and model and then use a task sequence to pick machine specific drivers. Getting the exact model name helps and one day to do that is via a WMI query. It’s a command I try to use quite a bit (and tend to forget the command half the time).

wmic csproduct get name

The result should give you the exact name returned by WMI and allow you to use it as a variable in your task sequence. Then, just plug in your model you are targeting into an MDT or SCCM task sequence condition. For an SCCM example;

SELECT * FROM Win32_ComputerSystem WHERE Model LIKE "%OptiPlex 9020%"

Another useful one is;

wmic bios get serialnumber

This one shows the machine serial number and if you’re not using SCCM can be useful for warranty claims.

The Network Policy Server Service (NPS or IAS) Fails to Start on Windows SBS Server 2008 with an unspecified error (0x80004005)

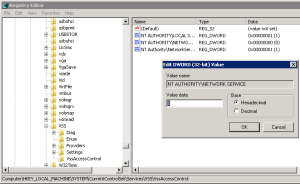
vss registry keySo I was recently helping out a client clean up their Small Business Server environment, one thing they weren’t using was SharePoint, so we decided to remove it from their SBS 2008 server. The removal went smoothly, simply uninstalling SharePoint Services via Add/Remove control panel did the trick. But after a restart we found that clients were no longer connecting to their Wireless network, so I went did some troubleshooting and found that the NPS service hadn’t started since boot-up.

I then tried starting it up but got an error after trying to start the service with an unspecified error 0x80004005 which was very helpful. After some more digging around and Google-Fu I found that this had to do with permissions on a registry entry for VSS. The following key needed to be updated from the value 1 to 0.

HKEY_LOCAL_MACHINE\SYSTEM\CurrentControlSet\Services\VSS\VssAccessControl

Make sure that the setting for NT AUTHORITY\NETWORK SERVICE is set to 1. If this is not and set to 0, change it to 1.  Once you have changed the value you can restart or terminate any IAShost.exe that are running via task manager and then start up the NPS service.

This issue has been documented by Microsoft to occur if you remove SharePoint from SBS Server 2008, so just a heads up if you do and rely on NPS for authentication for things like Remote Access or Wireless.

How to log into ASDM for a Cisco ASA when you get the Unable to launch device manager error

I like to keep my client’s devices up to date to prevent any issues from arising and have access to the devices latest features. Unfortunately not everyone is happy to pay that little extra to have an on-going support / maintenance agreement.  I was recently out at a customer who had an ASA 5505 which had been running for years but needed some new NAT translations added in.  So I fired up my laptop and loaded up ASDM Launcher, after typing in the credentials I got Unable to launch device manager on ASA-5505 error.  One thing I like to do when this happens is to check why, click on the Java icon in the login window and you will be prompted with the Java console, I saw the following;

javax.net.ssl.SSLHandshakeException: java.security.cert.CertificateException: Java couldn't trust Server
    at sun.security.ssl.Alerts.getSSLException(Unknown Source)
    at sun.security.ssl.SSLSocketImpl.fatal(Unknown Source)
    at sun.security.ssl.Handshaker.fatalSE(Unknown Source)
    at sun.security.ssl.Handshaker.fatalSE(Unknown Source)
    at sun.security.ssl.ClientHandshaker.serverCertificate(Unknown Source)
    at sun.security.ssl.ClientHandshaker.processMessage(Unknown Source)

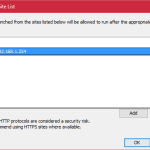
java_securityThe main thing sticking out to me was Java couldn’t trust Server to fix this I needed to load up the Java control panel once open navigate to the Security tab > Edit Site List… > Add > Enter the URL of ASDM.  In my case that was https://192.168.1.254/ once I added that, click Ok and Apply and close out of your browser / ASDM Launcher.  Now if you try to log in again it should let you through into ASDM and allow you to make the changes you need.

Another method to resolve this error is to export the certificate of the device to your computer (use firefox and navigate to the appliance web page and export the SSL certificate) then import it into Java using the control panel method above but hit Manage Certificates…

If you’re running a new version of ASDM, this doesn’t happen, also some say downgrading Java to 1.6 will remove the issue also.  Hope that helps someone out.

Getting a list of users in Active Directory as well as their Logon Script using dsquery and dsget

So I’m preparing on doing a clean-up of our NETLOGON/SYSVOL folder containing about 50 or so different logon scripts (plenty of which I know are no longer used).  I wanted to create a list of all of our active directory users along with what logon script they were assigned (I could then feed this list into excel and play around).  I realised that I could get this information using dsquery, but how exactly do I build a query to get a logon script.  The following command is what I used, I will then break it down for a better understanding.

dsquery user -name * | dsget user -display -loscr > C:\users_script.txt

So we’ve got our dsquery, which is really looking for AD object types of user with a name of anything, so basically ALL user objects in Active Directory (you can also optionally specify a limit using -limit).  We then pass on this list to dsget which will use this information to obtain the objects’ display name (with -display) and logon script (-loscr).  I am then simply piping the output to a text file.

So that is a quick and easy way of getting a list of all users in AD along with their logon script.

Deploying printers via Group Policy and getting them pushed out the right way as well as solving driver installation issues (0x80070bcb Specified printer driver was not found and needs to be downloaded)

So we recently upgraded our printing infrastructure with a whole new lot of printers and software (along with a shiny new version of PaperCut MF) and have implemented a global queue or better known as Follow Me Printing.  So how do we go about pushing out all the new global printers to our users.  Well along with the 50 other projects we have on the go, one of them is a clean up of our group policy, so after removing around 15 GPOs related to our old printers I got to work.

So for starters I’ve created a GPO which will contain all of our Follow Me Printing settings, including deploying the PaperCut Client and Global Queue Printers. In our environment we have a mix of Windows XP, Windows Vista and Windows 7 which will all handle printers being deployed via Group Policy differently (Microsoft make things so easy, don’t they).  For XP, things are simple, simply add the printer to be deployed either by user or computer preference under control panel > printers. For Vista and 7 however this is where it gets tricky.  If you are using a driver which has been loaded on the machine before, the printer will deploy, otherwise you will receive an error in the event log such as the following:

The user 'Printer Name Here' preference item in the 'Group Policy Object
{GUID-GOES-HERE}' Group Policy object did not apply because it failed with
error code '0x80070bcb The specified printer driver was not found on the system
and needs to be downloaded.' This error was suppressed.

This basically means that the client couldn’t download the driver, but the real reason is because of UAC and the computer not requesting permission to install a driver. Thankfully there is a Policy that we can enable that will allow us to set the permission requirements during printer driver installation.

Using the Point and Print Restrictions Policy we can enable printer driver installation without it getting hassled by UAC. Under Windows Vista it is a User Policy and on Windows 7 it is a Computer Policy (I have both enabled for good measure). So enable toe Point and Print Restrictions Policy and change the following options:

  • When installing drivers for a new connection: Do not show warning or elevation prompt
  • When updating drivers for an existing connection: Show warning only

Once we have configured the Point and Print Restrictions Policy printers will download and install on any client computer that the Object is targeting.

Hope that helps a few people out when setting up and configuring their Group Policy Printer Distribution, any queries please comment.

Getting back the OneNote 2010 Printer by Installing a generic printer driver, and then configure it for Microsoft Office OneNote 2010

So we had a few users delete their OneNote printer from the Printers List in Windows.  OneNote is a great program and is bolstered by the use of the printer allowing you to push pretty much anything into OneNote. We ran an office repair but the printer didn’t actually return for our users, so I started looking at how the OneNote printer is configured and created a new instance of the printer.  The following is basically a walk through of installing and configuring a local printer for OneNote 2010 (also applies to OneNote 2007).

First off we need to install the generic printer driver in Windows. To do this, follow these steps:

  1. Click Start, type printers in the Start Search box, and then click Devices and Printers in the Programs list.
  2. On the left side of the page near the top, click Add a printer.
  3. In the Add Printer dialog box, click Add a local printer.
  4. Click to select the Use an existing port option, select the appropriate port, and then click Next. For example, you can select LPT1.
  5. Under Manufacturer, select Generic, select Generic / Text Only under Printers, and then click Next.
  6. If you receive a message about drivers, click to select the Use the driver that is currently installed (recommended) option, and then click Next:
  7. Click Next, and then click Finish.

So now how do we go about configuring this newly installed generic printer for use with OneNote, follow these instructions for doing that:

  1. In the printer list, right-click the Generic / Text only printer, and then click Printer Properties.
  2. Click the Ports tab, and then click to select the Send To Microsoft OneNote Port check box.
  3. Click the Advanced Tab, select Send to Microsoft OneNote Driver in the Driver list, and then click Print Processor.
  4. Under Print processor, select winprint, select RAW under Default data type, and then click OK.
  5. Click the General tab, change the name of the printer to Send To OneNote 2010, and then click OK.

And now we can finally use the printer to submit pretty much anything to OneNote 2010.  We didn’t really learn why the Office repair didn’t re-add the printer as the research we found on the internet led us to believe that it would add the printer, but just in case it doesn’t you now know how to manually add it.

Procurve Switches and Windows Network Load Balancing in Multicast Mode causing high collision and drop rates

Over the last few days we have been looking at getting a Client Access Array going for our Exchange 2010 setup for basic redundancy and load balancing. I thought I would outline an issue we discovered with using Windows Network Load Balancing in a HP switching environment.

The first is whether to use Unicast or Multicast modes for the NLB Traffic. It is important to remember that Exchange does not care if you use Unicast or Multicast and is entirely dependent on your switching environment. At first we were confused as to which to choose due to the myriad of documentation suggesting either protocol. So we decided to give multicast a go.

After a few minutes our core switch (an 8212zl) started dropping packets for our services VLAN. We shut off the NLB and everything had returned to normal.  After a bit of digging we found that ProCurve switches are not compatible with multicast mode NLB due to their inability to have static ARP tables (they can only cache). But this can be remedied somewhat by issuing the following command on some models of switches:

ProCurve(config)# ip arp-mcast-replies

The command is supported on HP ProCurve E8200zl series, E5400zl series, E3500yl series, E6600 series and E6200yl series switches support Microsoft Windows NLB in Multicast mode.  Simply ensure that these switches are running K.15.03.0007 or greater firmware.