I was recently helping troubleshoot an issue where as part of that I needed to get a 50GB SQL Database transferred from an interstate client onto our servers. Both the client and us have a decent Internet Connection and we already had an FTP server in place but I was worried about the sensitive nature of the material we were transferring, so I set about enabling FTP over TLS on our FileZilla FTP Server using our Public CA Digital Certificate, the process took a little fiddling and I’ll outline it now. One thing I would highly recommend is re-exporting this Certificate with a different private key than what you would normally use as FileZilla unfortunately stores it in plain text.
 Firstly, you will need the OpenSSL windows binaries (available here). Once downloaded, extract them to a handy place like c:\openssl and copy across your Certificate in PKCS#12 .pfx format (which is what our default format of the certificate is). So we have .pfx inside c:\openssl. Now that we are ready, open an administrative command prompt and CD into C:\OpenSSL (handy tip, in Windows Explorer when you are in a folder you want to open a CMD prompt to, just type CMD into the address bar and hit enter). Now there are two commands we will use with OpenSSL to convert and strip out what we need.
openssl pkcs12 -in <your.pfx> -nocerts -nodes -passin pass:<yourpass> | openssl rsa -out <output.pem>
and
openssl pkcs12 -in <your.pfx> -clcerts -nokeys -passin pass:<yourpass> -out <output.crt>
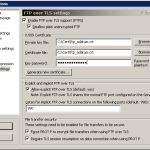 Once you have that, open both of them up in Notepad (or Notepad++), you will want to copy the Certificate extract from command two into the RSA Key we extracted in command one. Once we have that save the file as <yourcertnamehere>.crt. Open up FileZilla Server manager and go into Settings. Under the FTP over TLS Settings page, select the Certificate we created earlier and enter the Private Key for the Certificate and click OK. Now I’d recommend using WinSCP to connect as it trusts certificates already in the Windows Trusted Root CAs Store (FileZilla will always prompt to trust).
Share this post with others: