Configuring SharePoint 2007 to accept blocked file types

One of my clients using SharePoint 2007 were uploading some files to their site recently and got the following error:

The following file(s) have been blocked by the administrator

By going through Central Administration, I was able to unblock the file and allow them to upload the particular file to the library they were wanting uploading to. After opening up Central Admin, Click on the Operations Tab and look at the Security Configuration Section. Under it you will see Blocked File types (Forth Down), click on it. This by default selects your default site, if required change this. You will now have a large list showing all of the blocked file extensions, allowing you to add and remove them from the list.

In this case we wanted to allow MSI files so they could deploy a setup file through SharePoint as a storage point should users need to re-install. Remove the offending file type and click OK which takes you back to the operations page.

Simple as that, now going back into your SharePoint site, you can see that the file type has now been allowed and can be uploaded to the libraries you are using under the site it was enabled for.

Check to see if your KMS can be contacted

Sometimes when deploying computers in our organisation, they don’t see our KMS server and automatically activate (even though they are told to do so via our unattend.xml). 9 times out of 10 it’s the client itself having issues just talking to your KMS server. To check and see if you can contact it, you can perform a DNS lookup for the KMS Host. Open a command prompt window and type in the following:

nslookup -type=srv _vlmcs._tcp.<FQDN>

replacing the <fqdn> with your fully qualified domain name. It will look up the DNS record which the Software Licensing service checks to contact a KMS host. From here you can try and ping the machine using the above DNS entry.

You can also use some other commands on the KMS host to ensure that it is working correctly and accepting clients and activating them. Opening an elevated command prompt window on your host machine you can use the following:

slmgr /dli
slmgr /dlv

These two commands will show you detailed information about your KMS host machine such as the number of failed/successful activations as well as client counts.

BackupExec unable to read or write to the Database

Today when checking one of the servers I manage, I got an error when opening up the BackupExec 12.5 management console. The error was “Unable to read or write to the Database” which I found a bit puzzling. I checked to make sure SQL Server which hosted the BE database was running, and it was.

After having a quick look in the Application Event Log, I found an error relating to the issue I was experiencing. Event ID: 33152.  Thankfully the fix for this error is quite simple.

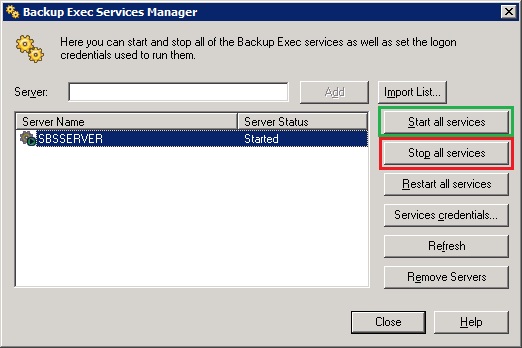
Open up the Backup Exec Services Manager and click on Stop All Services. Now open up the SQL Server Configuration Manager and restart the instance of SQL Server hosting your Backup Exec database. Once it restarts, return to the Backup Exec Services Manager and click on Start All Services to start them all up again. Once they’re up, open the management console.  If all went well it should now log you in successfully and show you the current status of your server.

Letting Exchange accept Mail from other domains

One of the usual things I perform as an IT Consultant is maintenance and configuration tasks on Exchange. One of the most requested tasks is accepting e-mail for more than one domain. Most of my clients run Windows SBS Server 2008 which comes with Exchange 2007. In this article I will walk through accepting mail from other domains.

Firstly, open up the management console, expand Organization Configuration, click on Hub Transport and finally select the Accepted Domains tab. Now under the Actions for Hub Transport click New Accepted Domain…

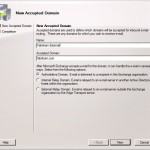
The New Accepted Domain window now pops up. Configure it with your new domain.  The domain must be yours and  its MX record configured to point to your exchange server. After you enter your domain, there are three options to tell exchange how to handle mail. Authoritative Domain tells the exchange server to accept ALL e-mail for this domain, if a user doesn’t exist then an NDR is generated and sent to the sender. The Internal and External relay options are handy, if you have multiple domains with multiple exchange servers, you can choose the Internal Relay option, which will look for other exchange servers under the forest for your entire organisation.

The third option is the External Relay. This is useful for those domains which you don’t ‘own’.  A prime example are franchise companies. Which may have one e-mail for a particular store or location, allowing you to send and receive for that domain to users not on your exchange server.

And That’s it. Simply ensure that the domain’s MX Record is pointing to your server, or if you are using the SBS POP3 Connector this will now properly process e-mails for that particular domain.

Server Side E-Mail Validation with PHP

Validation is one of the most important things which can be done on a public-facing website. It prevents users from entering required information incorrectly or even worse attempting to damage your site via some form of script or SQL Injection attack.

Recently I was developing a website for a Real Estate firm, as a legal requirement they need to have valid e-mail addresses to link up to views of listings. Client Side e-mail validation is fairly simple, but what if the user is malicious and removes the JavaScript or just has JavaScript disabled. So I added both client and server side e-mail validation.

One important thing to remember is to always sanitise your inputs whenever something is going into a database, but that’s for another article. There are several ways to tackle e-mail validation, I let the Client Side handle the format and let the server do some heavier work. Firstly, it required making the function. I’ve called it checkEmail, we also need to pass it an e-mail address via $email.

function checkEmail($email)
{

We then move on to setting things up, creating our error variable and getting our e-mail argument and ensuring it is safe.

    $email_error = false;
    $Email = htmlspecialchars(stripslashes(strip_tags(trim($email))));

After getting the address from our function call, perform a simple test to see if there is anything and if there is begin validating. If not pass our error and tell the user.

	if ($Email == '') { $email_error = true; }
	elseif (!preg_match('^([a-zA-Z0-9._-])+@([a-zA-Z0-9._-])+\.([a-zA-Z0-9._-])([a-zA-Z0-9._-])^', $Email)) { $email_error = true; }

There is a piece of nifty REGEX which simply validates if we have a valid e-mail address in a specific format of an e-mail address of [email protected] with only alphanumeric and – . _ being accepted. If our REGEX passes we then begin to do some checking, which is where the server side validation comes in. We explode our e-mail address to extract the domain and using PHP’s inbuilt checkdnsrr function we can perform an MX Lookup of the supplied domain.

	else {
	list($Email, $domain) = explode('@', $Email, 2);
		if (! checkdnsrr($domain, 'MX')) { $email_error = true; }
		else {
		$array = array($Email, $domain);
		$Email = implode('@', $array);
		}
	}
	if ($email_error) { return false; } else{return true;}
}

If the checks all pass then we return FALSE and allow the form to submit with code embedded on the calling page. If we do get an error then we return TRUE with code again embedded on the calling page to notify the user.

And there you have it,  server side e-mail validation. Of course you could improve on what I’ve done by actually checking for an alias on the particular domain or by sending out an e-mail validation to the address before the user can continue, but that is all beyond the scope of this function and article. If you do end up using this function, I’d love to hear where you are using it, so feel free to let me know.