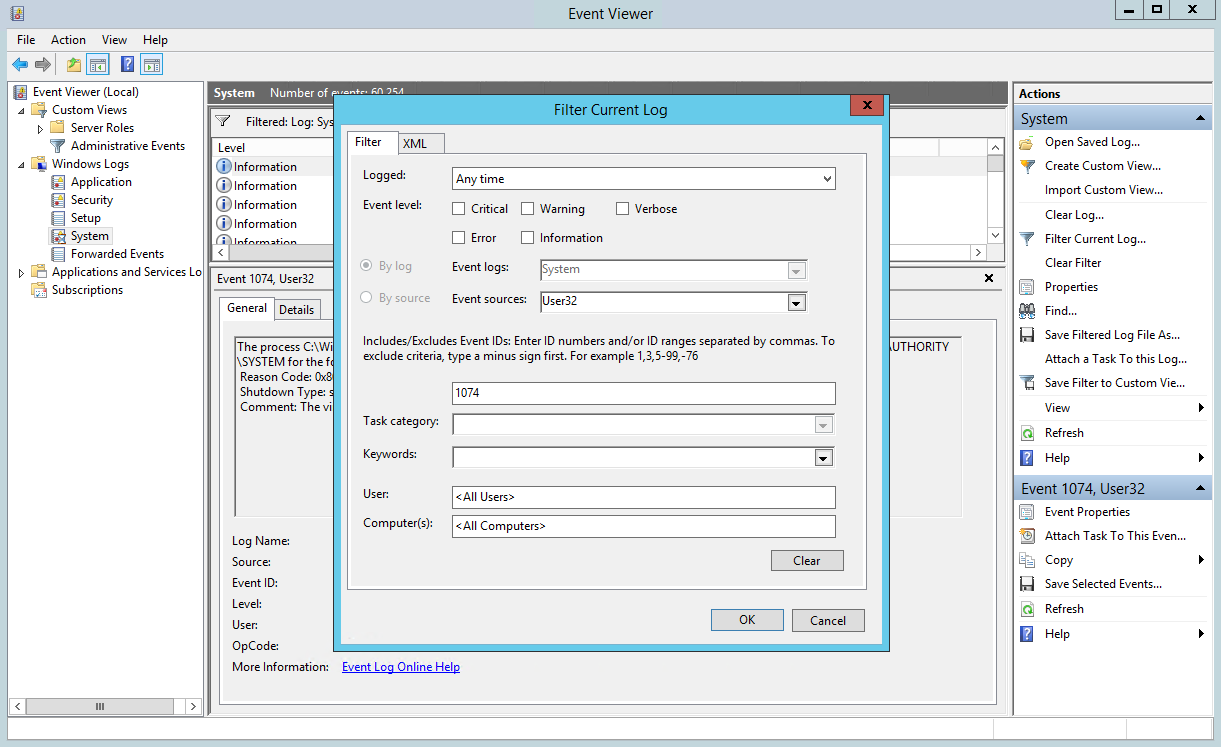
Start by going into Event Viewer (Windows+R or the Start Menu and type eventvwr.msc). Navigate to the System Log under Windows, we then want to use Filter Current Log to allow us to only show Events with certain attributes (such as Source or IDs).
In our case, we want to filter on Event Source: USER32. Then for Event IDs we want to see only 1074. If you are after unexpected shutdowns, use 6008. Once that’s in (like the pic on the right), click OK and this will filter the event log based on our requirements. You can scroll through and see what and who initiated a shutdown.
So getting BitLocker enabled in an Active Directory environment is fairly painless and helps to get your end user devices more Secure. I’ll outline the steps you need to take to enable it as well as get the recovery keys stored in Active Directory. I’ll also dive into replicating this setup on Azure AD/Intune in a future post.
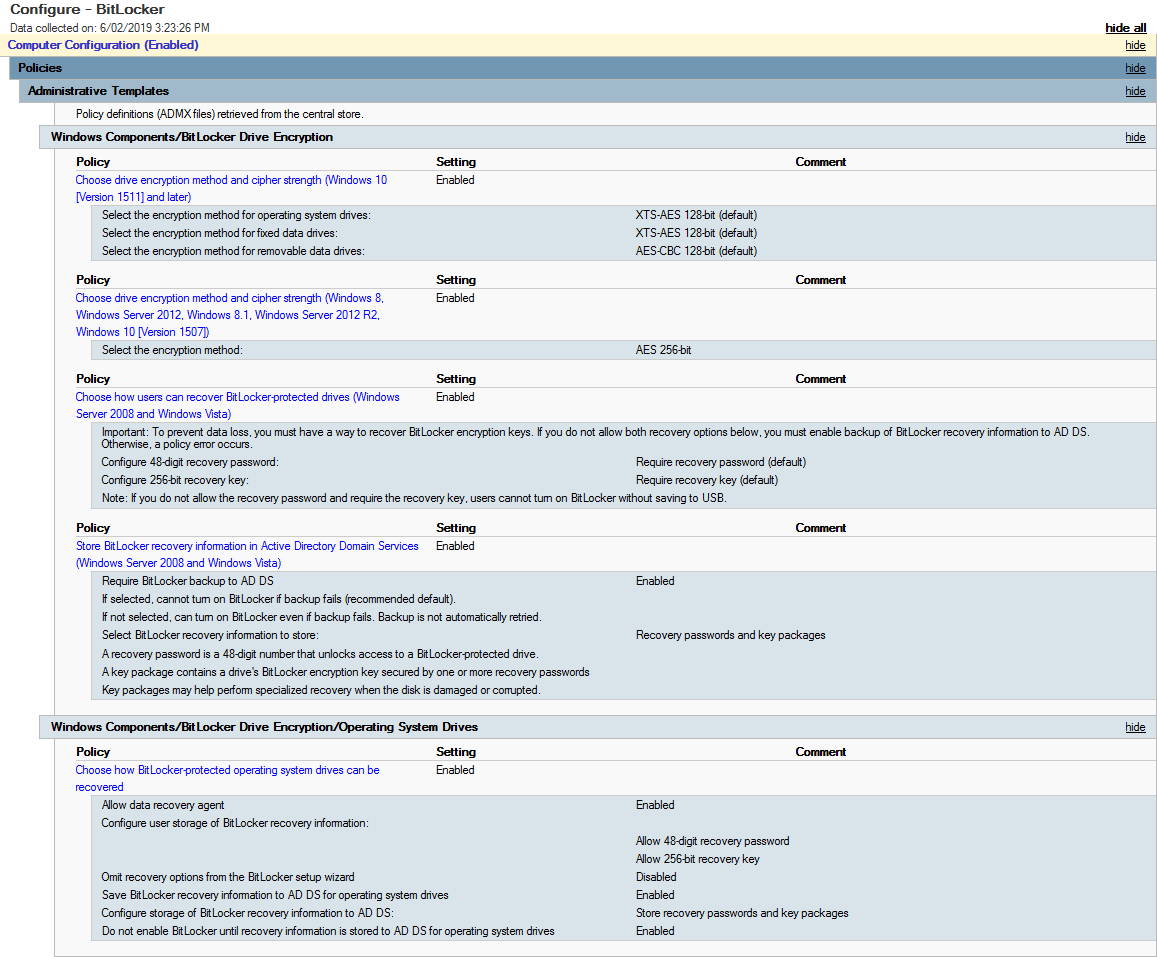
First thing is to create a new GPO (i.e. Configure – BitLocker) – Edit it and navigate to Policies > Administrative Templates > Windows Components > BitLocker Drive Encryption. Enable the following Options:
Choose drive encryption method and cipher strength (Windows 10 Version 1511 and later)
Choose how users can recover BitLocker protected drives
Store BitLocker recovery information in Active Directory Domain Services
Then go down one folder into Operating System Drives and enable the following:
Choose how BitLocker protected operationg system drives can be recovered
Once you’ve set this all up, it should look something similar to the image below.
Group Policy Settings for BitLocker
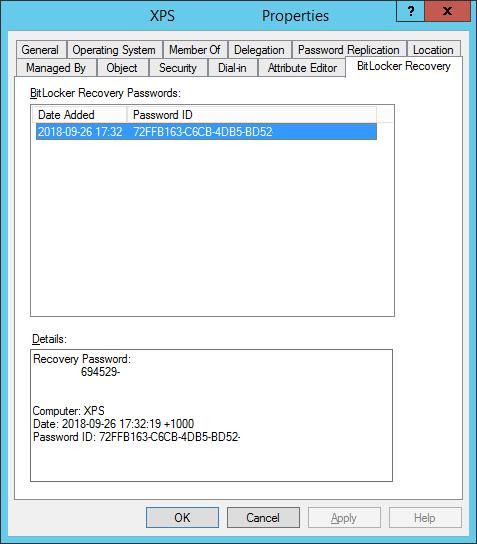
BitLocker Recovery Key in Active Directory
Now target the GPO to some machines and if you’re running 1809 (from what I’ve discovered so far) or later you’ll notice them start the BitLocker process to encrypt automatically. If not then you may need to check and ensure the TPM is enabled for the device (as we haven’t specified to encrypt devices without a TPM in this case).
What happens if you have already enabled BitLocker but now want to store the recovery keys in Active Directory? With this GPO set it will allow windows to write the recovery key to AD however we need to use the manage-bde utility, that is a command based utility that can be used to configure BitLocker
manage-bde -protectors -get c:
for /f "skip=4 tokens=2 delims=:" %%g in ('"manage-bde -protectors -get c:"') do set MyKey=%%g
echo %MyKey%
manage-bde -protectors -adbackup c: -id%MyKey%
I saved that as a batch file and ran that on the machines that had already been encrypted prior to rolling out the GPO. Once run, it escrows the key into Active Directory.
The last bit you will need to do so you can actually see the keys in the Properties tab or via the Search function in Active Directory Users and Computers, ensure that the BitLocker RSAT is enabled in Server Features and Roles.
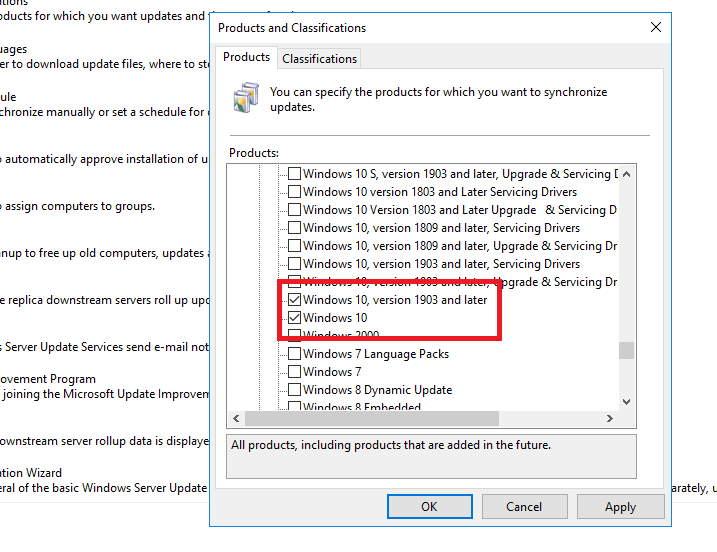
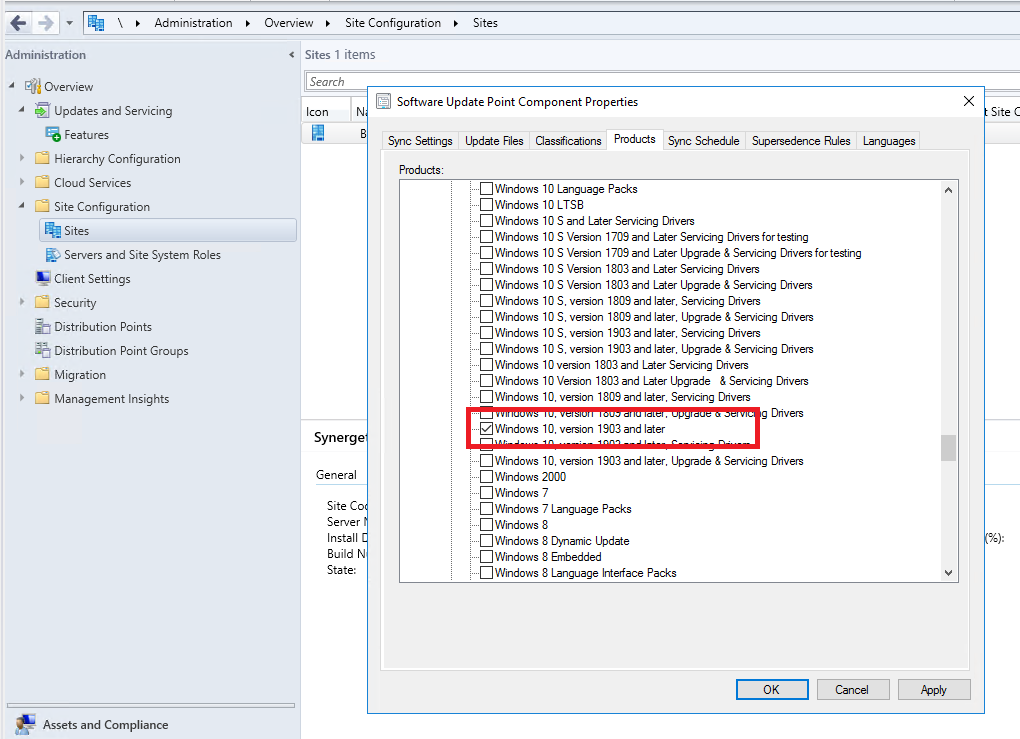
We’ve started to deploy the latest release of Windows 10 and it’s interesting to note that Microsoft have released with little fan-fare some changes to the way Updates are deployed for the 1903 release.
Microsoft are now pushing updates through what is called the Unified Update Platform (see this RPC Mag article). Anyway, the main thing is there is now a new product category for WSUS and Config Manager that needs to be configured before your clients will being to receive updates.
You’ll see there is now a Windows 10, version 1903 and later product – make sure that is ticked on your Update Management Tool for updates to by synchronised. Once we had that ticked, for Config Manager you may need to tweak your Automatic Deployment Rule to include additional filters based on how you have it setup. Microsoft have also blogged about these changes here.
I’ve been working on needed to copy a number of files from one client site to another, my issue is that they have separate Active Directory domains and there is no trust between them. Using PowerShell, we can save a user credential and then use that to map a network drive with them and perform our copy.
We will setup the credential to be stored in a text file, although a cool feature of PowerShell it’s very limited in that it can only be decrypted by the user who created it on the same local machine (which is fine for our needs). The following cmdlet will prompt for a string to encrypt, which in this case is our password.
Once done, we will build up our PowerShell script that will read the file, map a network drive via PowerShell which will use the secure credentials and then copy across our files.
Working with one of my education customers I recently had to perform some maintenance on their SQL Database server as they were running low on disk space AND had a free unused virtual disk where we could throw their tempdb onto (it was meant to go here but they didn’t place it there during installation). So I had the task of moving it over.
First step is to get an as-is of where tempdb currently is and how many fragments there are; Open up SQL Management Studio and run the following query.
-- Lists all current tempdb files and their paths
SELECT name, physical_name AS CurrentLocation
FROM sys.master_files
WHERE database_id = DB_ID (N'tempdb');
GO
Now that we have a listing (similar to our screenshot above/left), we then need to build up a query to move the database files from one drive to another. It should look something similar to the below query, changing paths and adding/removing tempdb fragments as needed (simply add more alter database statements for each file node).
USE master;
GO
ALTER DATABASE tempdb
MODIFY FILE (NAME = tempdev, FILENAME = 'F:\MSSQL14.MSSQLSERVER\MSSQL\DATA\tempdb.mdf');
GO
ALTER DATABASE tempdb
MODIFY FILE (NAME = templog, FILENAME = 'F:\MSSQL14.MSSQLSERVER\MSSQL\DATA\templog.ldf');
GO
ALTER DATABASE tempdb
MODIFY FILE (NAME = temp2, FILENAME = 'F:\MSSQL14.MSSQLSERVER\MSSQL\DATA\tempdb_mssql_2.ndf');
GO
ALTER DATABASE tempdb
MODIFY FILE (NAME = temp3, FILENAME = 'F:\MSSQL14.MSSQLSERVER\MSSQL\DATA\tempdb_mssql_3.ndf');
GO
In the above example we have specified F drive. The other thing to note is that if you have SQL Server running through a service account, that will need NTFS modify permissions to the destination. Once that is executed under the Master database context the files will then be re-created on the next SQL Server service restart.
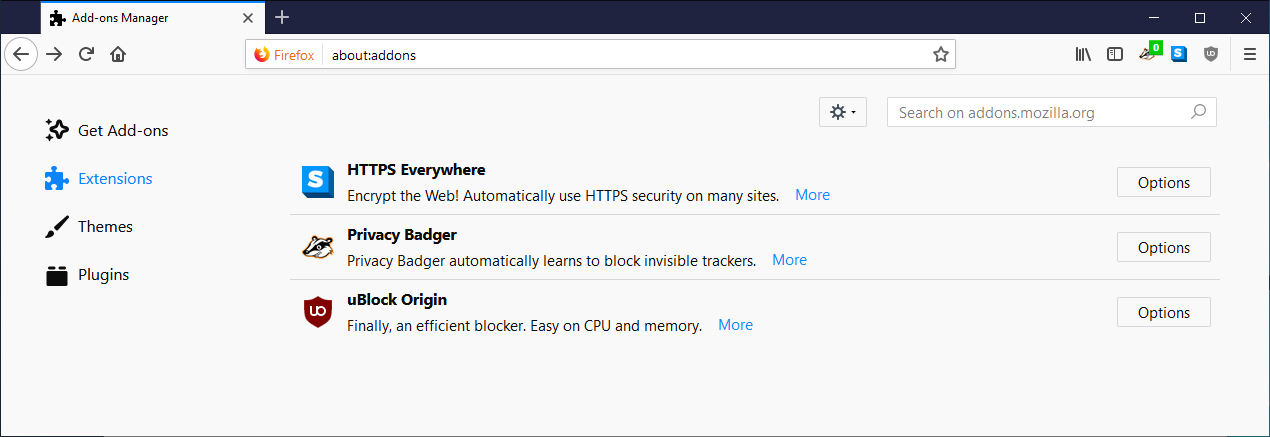
So we’ve been deploying Firefox for quite a while pretty much everywhere we can however, only recently have we started standardising the deployments across the organisation’s that we manage. We’ve deployed Internal Root CAs using the CCK2 method to improve our user experience with Deep Packet SSL inspection however setting up configurations and extensions and having that consistent was a challenge. Recently I learnt that Mozilla begun developing Group Policy Objects not long ago and that now allows for enterprise management straight into Firefox without the fuss. In this article I’ll go through setting up uBlock Origin, HTTPS Everywhere and Privacy Badger which are our go to Extensions for end-user protection.
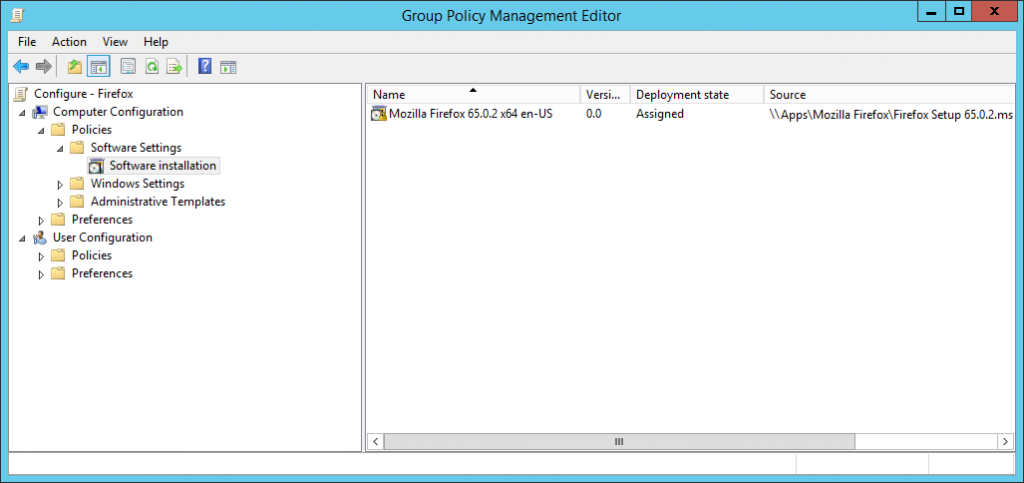
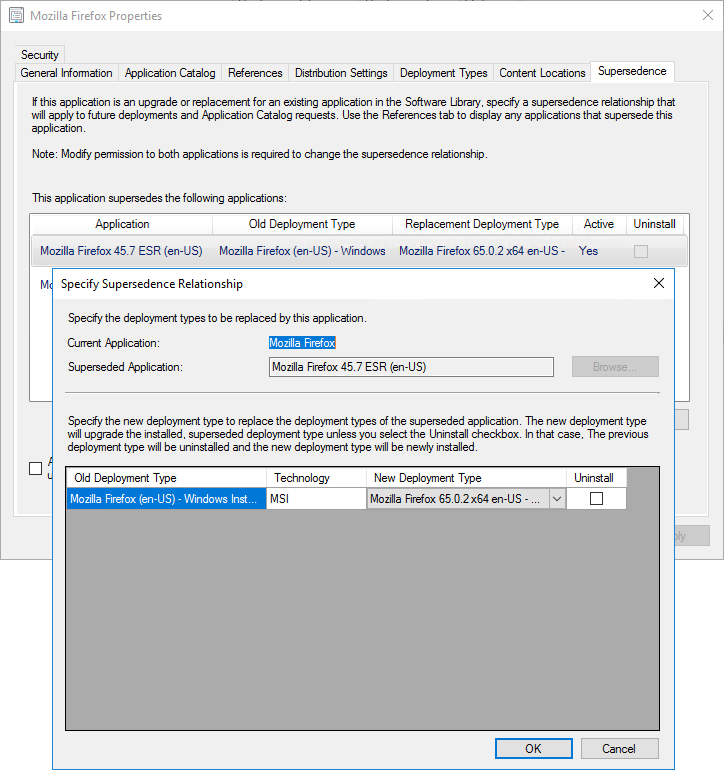
To deploy Firefox (or any windows application), you generally want to use an MSI based installer (for better control and management). Mozilla have now been building them for a shot while via their Enterprise Deployment Support page for beta and standard releases. If you are after the Extended Support Release (ESR), visit the FrontMotion download page (they also offer a number of other services such as a custom packager). In a managed environment you’d either use Group Policy to deploy software or System Center Configuration Manager or some other form of MDM (ala InTune). The MSI should be in a network share accessible by all machines, you would then be imported either into Policies > Software Settings > Software installation for Group Policy (then Right-Click, New > Package) or an Application under the Software Library for Config Manager and pushed out. There are much better guides than what I can fit in here so please Google if you’re unsure. In our case, I used Config Manager and since we’re upgrading and I’ve setup a Supersedence rule like below.
Once Firefox is being deployed we need to get these extensions onto the machines, so the first part is getting the URLs of the extensions you wish to deploy. Visit the add-on store and start searching for what you’re after. For our example, as mentioned we will be installing uBlock Origin, Privacy Badger and HTTPS everywhere. When you are at the add-on page, right-click on the Add to Firefox button and select Copy Link Location and save that for later. Once you have your list of Extensions it should look like something similar to the below (I’ve removed the tracking string at the end).
Next is to get the Group Policy Definitions from Mozilla and load them onto your Active Directory Group Policy. I’d highly recommend you have a Group Policy Central Store setup as it makes managing this stuff a whole lot easier. Download the latest version or ones that match your deployment of Firefox from the Mozilla GitHub Releases page, unzip and then copy across those files to the Group Policy Central Store or required location. Now the fun part.
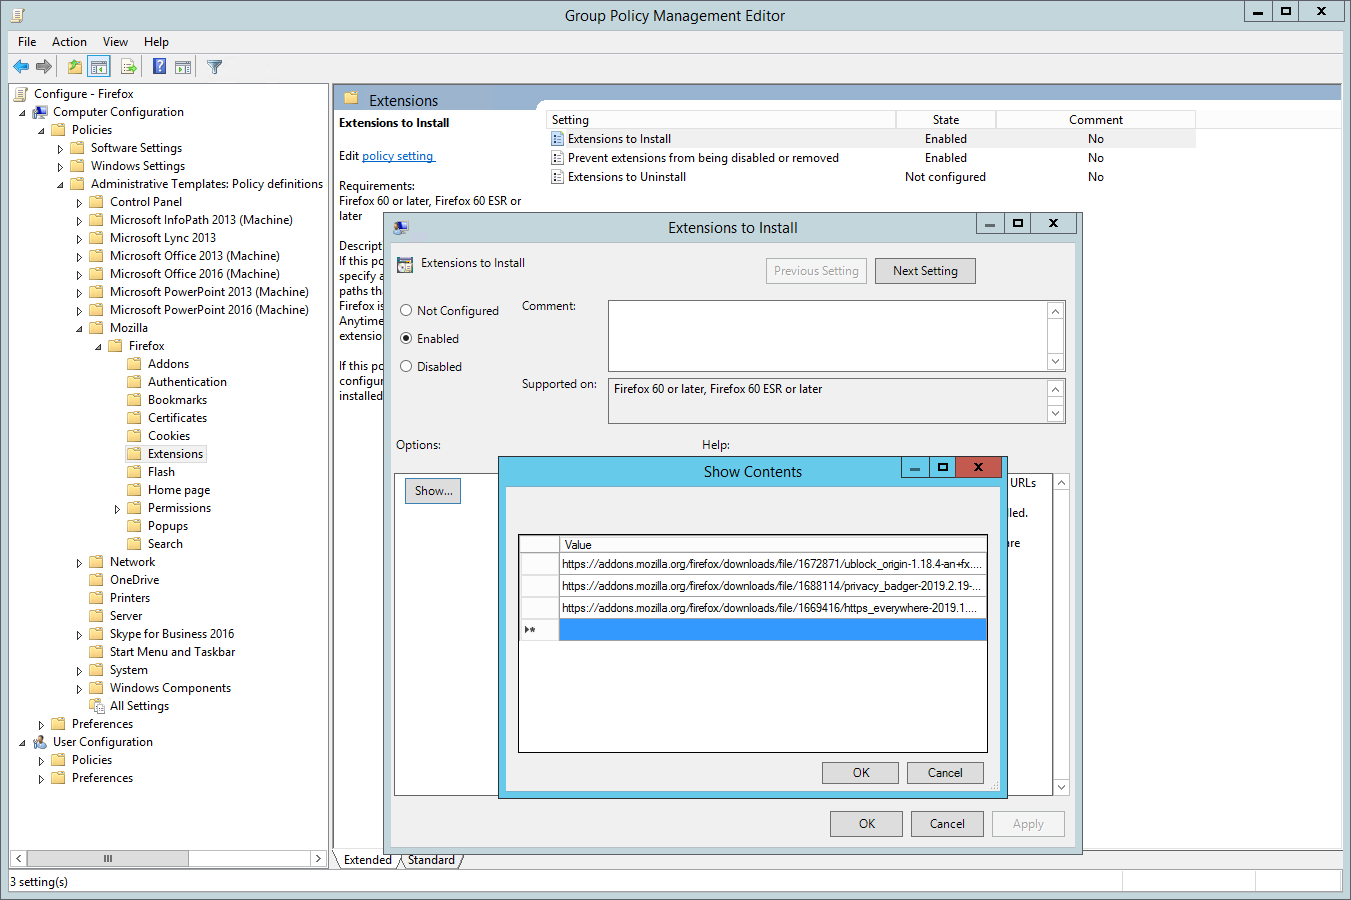
Create a new Group Policy Object, in my case Configure – Firefox and then open it up, and navigate to the following policy branch; Computer Configuration > Policies > Administrative Templates> Mozilla > Firefox > Extensions. Here we will be enabling Extensions to Install. Using the list we compiled earlier, enter the URLs one by one into the list so it will look like something similar to the below.
The next step I’d recommend, is we want to stop or prevent our end users from being able to remove these extensions/protections. To do this we need to get the Extension IDs, so fire up Firefox and install the list of Extensions we compiled earlier (if you didn’t already for testing). Now the easiest way I’ve found of getting the Extension IDs is to use the in-built memory profiler of Firefox. In the address bar enter about:memory and once it loads under Show memory reports group, click Measure. Do a search for Extensions and you’ll get to a list of all currently running extensions. Now extract everything for the id key (in this case a GUID but can be text as well);
Extension(id={d634138d-c276-4fc8-924b-40a0ea21d284}, name="1Password X – Password Manager", baseURL=moz-extension://31872614-f67c-4cda-84e4-18c0515c8b48/
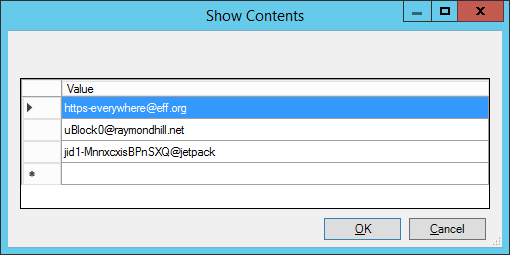
The above is an example of what you’ll find in the list (using 1Password). Below is what we’ll be entering into the Prevent Extensions from being disabled or removed based on our setup so far – with the last line belonging to Privacy Badger.
Now that we have the list of Extension IDs we want to enter these into the Prevent extensions from being disabled or removed Group Policy setting located in the same branch as Extensions to Install. Again, enter them into the list one by one until you have something similar
Once that is configured, apply the Group Policy Object to your Test Machines preferably with Mozilla Firefox installed on it, log in and do a gpupdate /force with the end result being those Extensions magically appearing as per the below image.
Over the summer holiday period, I was assisting a school with building out an SoE for the new year. One of the things we used to do with Windows 7 was tweak the Taskbar to contain only items we were after instead of the default items of Internet Explorer, Windows Explorer and Windows Media Player. To do this we implemented a VB Script that would make the changes on the fly. And since that stopped working I’ve always wanted to sit down and try get it working again for Windows 10 and I’ll now share how I did.
You’ll want to begin by building out your Taskbar layout, add in any icons that you want and when you’re ready we can use a command to extract it. Alternatively, you can use the sample below to build your own manually, simply reference the location of the shortcuts you want to place in and the order.
Now that we have our Layout template ready, it is simply a matter of importing it. We do so by using the Import-StartLayout command. This can also be used to import a Start Menu tile layout however in this case we are only importing the Taskbar layout. Execute the command below (replacing the path with your own).
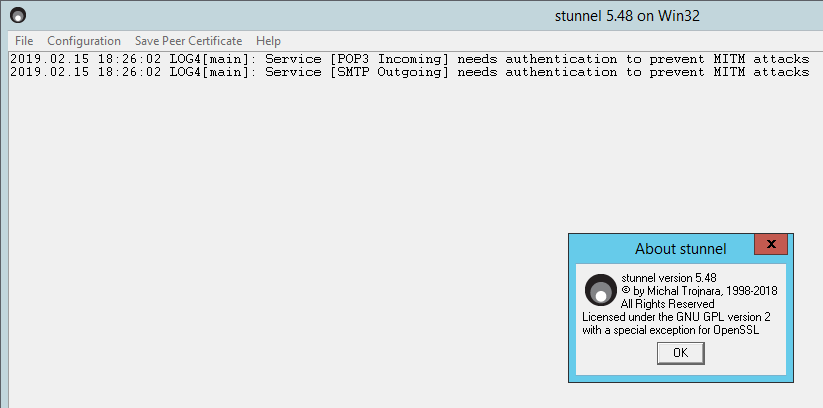
I’ve been busy lately assisting with a number of Office 365 migrations. Every single one is different and while many are straightforward, In some cases, you will find applications or devices that don’t support the requirements for connecting to Office 365 using TLS or SSL or they may not even work over standard ports such as 587. Working with one SMB recently, they had a critical Line of Business application that was written internally and can no longer be maintained by anyone in-house. They had identified a path forward however we still needed to keep the app running for around 6 months post migration to Office 365.
This is where stunnel, which is a TLS Proxy comes in handy. Grab the latest version from the stunnel website and install it. This little TLS/SSL proxy tool allows for us to listen for standard For our purposes we will install the Service instance so that it is always running whenever the server reboots. Once installed we can start building our configuration file. I’ve outlined a simple one below;
This allows any application local on the same server as sTunnel to connect up to SMTP and POP3 on the standard ports then push this onto Office 365. We’re also pushing everything to a log file If you have issues with certificates the remove the verifyChain and CAFile lines which will prevent stunnel from attempting to verify the cert we receive from Office 365. If you are looking at doing IMAP or even need to do more with stunnel, see the example config files for more.
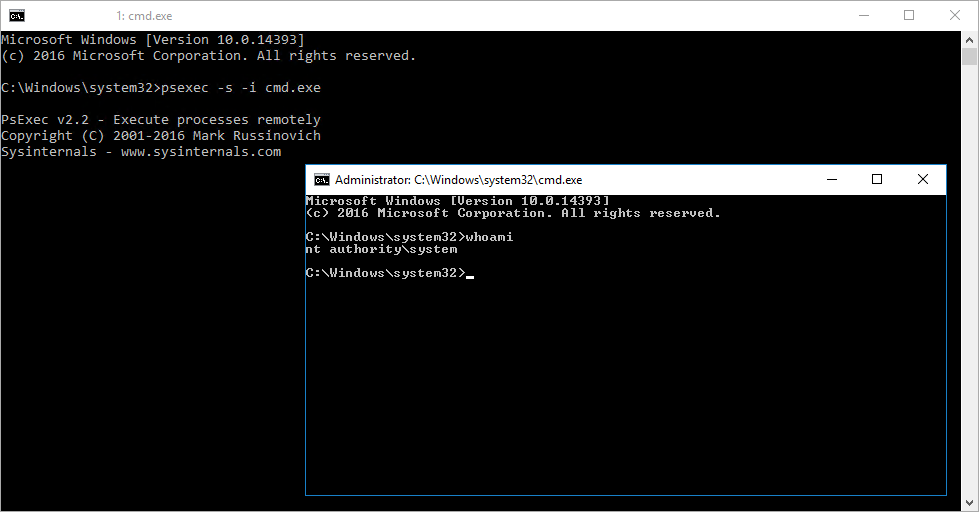
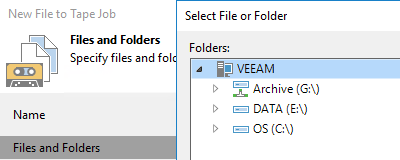
A customer of ours has a large archive of files located on a NAS device (around 15TB worth) that they want to simply push off to tape and then remove from the NAS. Network drives don’t show up in Veeam whilst creating backup jobs, so we needed a way to get this working. We use Veeam with a number of customers and understand quite well how things operate with it, as such whenever Veeam is working with a local file system it does so under the Local System context, which is what we need to get our mapped drive under, but how.
PSExec from SysInternals to the rescue. We can create a command prompt in the context of local system and then map our network drive for it to appear in Veeam’s Job Wizard. Grab the latest version and place that in the System32 directory under the Windows folder. Now we open an administrative command prompt and enter;
psexec -s -i cmd.exe
This opens a new window which is now running under our Local System context, which we can double check by using the whoami command. Our next step is simply to map the network drive using a NET USE command. We need to ensure we pass through some credentials as the local system will not have access to the share.
NET USE G: \\NAS\Archive /USER:Domain\User
Now we can go into Veeam and run our Create File to Tape wizard and during our Files and Folders selection, we can now see our mapped network drive (in this case G:\ or Archive) and add folders in from this mapped drive. We then proceeded to backup the data we needed onto tape for archive.
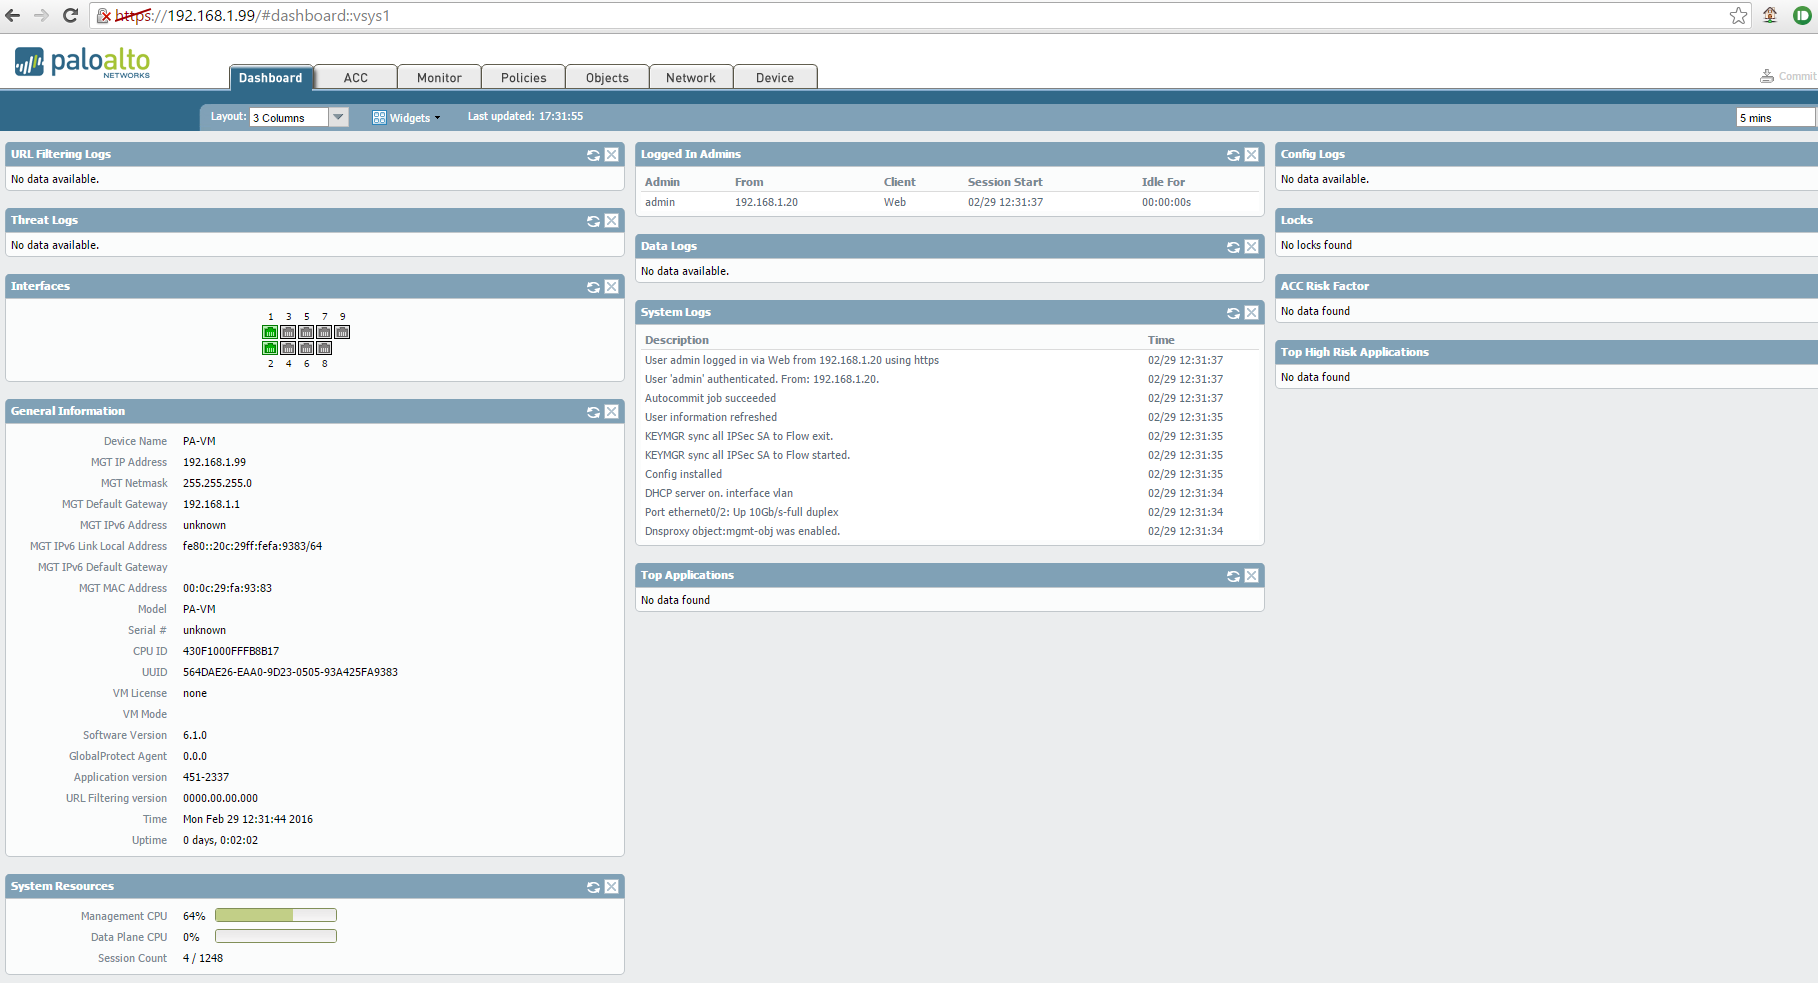
So I’ve recently started experimenting with a Palo Alto VM Firewall that we are about to trial. Unfortunately they don’t offer a Hyper-V virtual machine so I’ve had to stick this into dev our ESXi host.
After importing the .ovf, I edited the network adapters onto the right VLANs for me to get it going in a one-arm sniffer configuration. I then proceeded to power it up. Once it was loaded, I entered the default username and password (which are admin/admin) and entered the console of the device.
set deviceconfig system ip-address 192.168.1.99
netmask 255.255.255.0 default-gateway 192.168.1.1
dns-setting servers primary 172.16.1.5
I then entered commit for the PA to save the configuration I had just entered.
I performed a ping for safe measure and ensure the unit can communicate with with the outside world for updates with PAN and other services if required (ping host fortinet.com) and then logged into the web interface using the default credentials.
We use cookies to ensure that we give you the best experience on our website. If you continue to use this site we will assume that you are happy with it.Ok
 Start by going into Event Viewer (Windows+R or the Start Menu and type eventvwr.msc). Navigate to the System Log under Windows, we then want to use Filter Current Log to allow us to only show Events with certain attributes (such as Source or IDs).